Data transfer and Research Data Storage with High Performance Computing: Setup
1. Get a shell terminal emulator
To connect to Artemis HPC, and follow this lesson, you will need a ‘terminal emulator’ program installed on your computer. Often just called a ‘terminal’, or ‘shell terminal’, ‘shell client’, terminal emulators give you a window with a command line interface through which you can send commands to be executed by your computer.
A. Linux systems
If you use Linux, then chances are you already know your shell and how to use it. Basically, just open your preferred terminal program and off you go! An X-Window server (X11) may also be useful if you want to be able to use GUIs; again, if you’re using Linux you probably have one, and if you don’t have one, it’s probably because you intentionally disabled it!
Connection to Artemis can be made via ssh by issuing the following command on the shell:
ssh -X <unikey>@hpc.sydney.edu.au
B. OSX (Mac computers and laptops)
Mac operating systems come with a terminal program, called Terminal. Just look for it in your Applications folder, or hit Command-Space and type ‘terminal’. You may find that other, 3rd party terminal programs are more user-friendly and powerful – I use Iterm2.

We also recommend installing XQuartz, which will replace OSX’s native X-Window server. XQuartz has some extra features that may offer better performance when using GUI programs. You’ll need to log out and back in again after installing XQuartz in order for it to activate.
Connection to Artemis can be made via ssh by issuing following command on in the terminal:
ssh -X <unikey>@hpc.sydney.edu.au
C. Windows
If you’re using a Windows machine, don’t panic! You might not have used ‘CMD’ since Windows 95 but, rest assured, Windows still has a couple of terminal programs and shells buried in the Programs menu.
However, those aren’t going to work for us, as you’ll need extra programs and utilities to connect to Artemis, such as an SSH implementation. To use Artemis on Windows, you have a couple of options:
i. PuTTY (Recommended)
PuTTY, an SSH and telnet client, is a good simple option. However, note that PuTTY does not provide an X11 server, so you won’t be able to use GUI programs on Artemis with just PuTTY.
Head to https://putty.org and download PuTTY. You can install it to your computer, or just download the ‘binary’ and run it directly. Create a new session for use with Artemis as follows:
- Fill in the connection details:
- Host Name: hpc.sydney.edu.au
- Port: 22
- Connection type: SSH
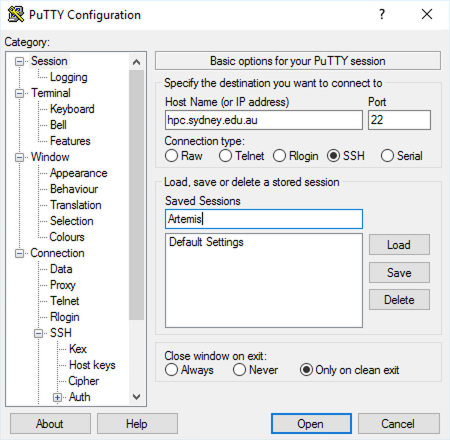
- Name this session “Artemis” and click ‘Save’
ii. MobaXterm
MobaXterm offers a rich experience as a full-featured X-server and terminal emulator for ssh connections, the free version is more than adequate.
iii. X-Win32
X-Win32 is full-featured X-server and terminal emulator for Windows. USyd provides a license for it; however, the download link is restricted to staff so, students. Install, and follow the instructions on the USyd-ICT page to activate – you’ll need to be on the USyd network or VPN to do so.
iv. WSL and Ubuntu
Install Ubuntu or some other Linux distro on the Windows Subsystem for Linux see here for details. This one will give you a full suite of Linux functions and I like it for emulating Linux.
2. Get a GUI file transfer application
If you are not fully comfortable moving data on the command line you can use various file transfer applications. Mac OSX and linuz have the command line tools built in already. Windows users will need to enable WSL and install a Linux distro (or CYGWIN or equivalent) or else use the interative platforms below.
A. FileZilla (Recommended)
This application can be installed on Windows, Mac OSX and Linux. Use it to make SFTP connections and move data between local and remote machines. Be wary of bundled bloatware on installation. https://filezilla-project.org/
B. WinSCP
Windows only, a great stand alone application to move data between local and remote computers. https://winscp.net/
3. Off-campus access
If you’re attempting this training by yourself, or following on Zoom, off-campus then you’ll need to connect to the USyd internet network before you can connect to Artemis.
There are a couple ways to do this:
A. The USyd VPN
VPN (Virtual Private Network) is a protocol that allows you to tap into a local private network remotely. Follow USyd ICT’s instructions on service now. Once you’ve connected to the Cisco Anyconnect VPN, the above connection methods will work, just as though you were on-campus.
B. Use the Artemis Jump server
Artemis provides a ‘gateway’ server, called Jump, that allows connections from outside the University network, and is itself on the network. From the Jump server, you can then connect to Artemis directly. If using the Jump server, you will need to edit the host address used in the instructions above:
- Instead of hpc.sydney.edu.au use jump.research.sydney.edu.au
This will connect you to Jump, rather than Artemis itself. You can then connect to Artemis directly via SSH. See Episode 1 of the Introduction to Artemis HPC course.
4. Graphical login nodes (Optional advanced connection)
There is one final way to access Artemis, and that is using our graphical login nodes. These special are graphics-enabled login servers which host ‘NoMachine’, a kind of remote desktop service.
To use the graphical login nodes:
- Download and install the NoMachine Enterprise Client for your operating system. Please don’t download the client from NoMachine directly, as their current version may not work with Artemis.
- If you’re using MacOS, you need to install XQuartz.
- Download the glogin.nxs session file to your computer.
To connect:
- Double-click or run the glogin.nxs shortcut you downloaded (it will open NoMachine Client).
- A NoMachine window should start, asking for a username and password.
- Replace “YOUR_UNIKEY” with your UniKey, then enter your UniKey password in the password field, then click ‘OK’.
- A short while later, an Artemis terminal window should open.