A simple GPU example, vector addition
Overview
Teaching: 5 min
Exercises: 5 minQuestions
What are the critical steps required in all GPU programs (hint: memory managment)
Objectives
Learn all 6 steps in every CPU/GPU by walking through a simple vector addition project
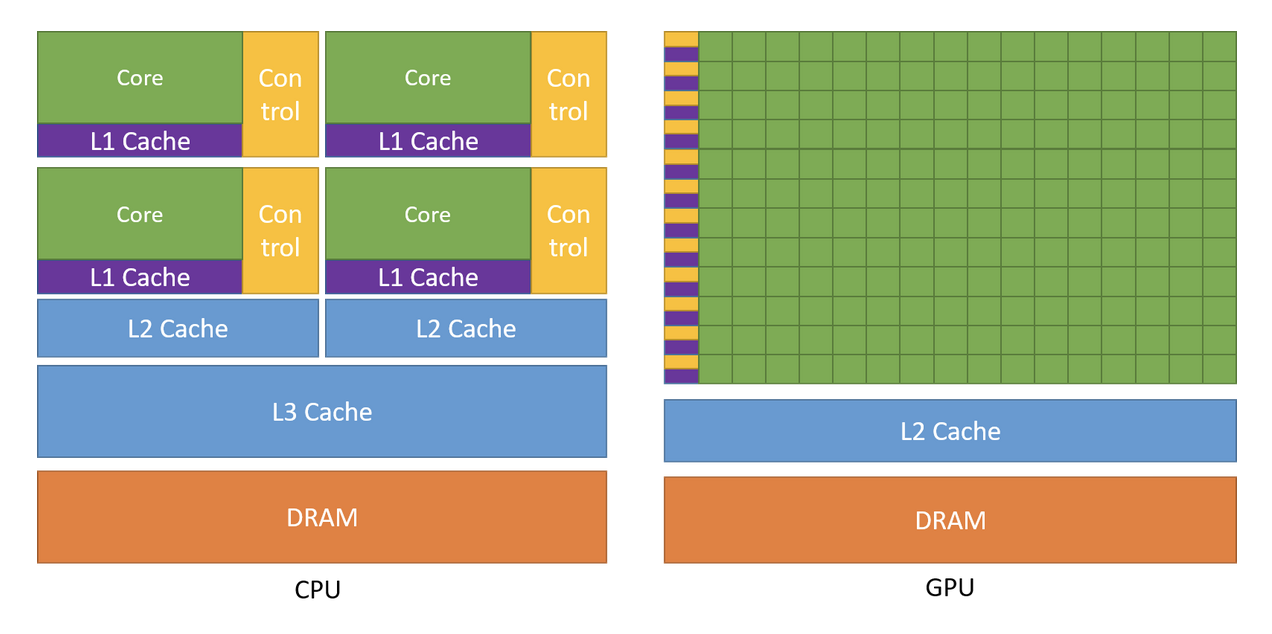
Review of CPU/GPU architecture
Before we start looking at the code for our first CUDA example, it will help if we review the basic CPU/GPU architecture again. The picture below shows how the two devices are designed. As we will soon discover, the two devices work TOGETHER on all computers and require manual memory management (i.e. the programmmer is required to handle the memory allocations, initialisations and movement both from and to the CPU and GPU).
An in-depth explanation of the CUDA programming model would be too much material for this training session, so we will only discuss the very basics. NOTE that every CUDA GPU project requires all 6 of the following steps in the following order.
- 1) Host (CPU) memory allocation and intialisation.
- 2) Device (GPU) memory allocation.
- 3) Copy input data from Host to Device.
- 4) Launch the kernels and check for errors.
- 5) Copy output data from Device back to Host.
- 6) Free up Device and Host memory.
Notice that memory management is the central focus of these tasks and moving data from the CPU (Host) to the GPU (device) and back are always done by the programmer. For interpreted programming languages memory management is handled by the interpreter behind the scenes so programmmers are removed from these tasks BUT for most compiled languages memory management is a significant part of any programmer’s code.
To understand the 6 steps above, we will use the vector add project (“vectorAdd_nvrtc” project is in the “0_Simple” folder under the “NVRTC Samples” subfolder). The goal of this project is adding two vectors by parralizing the element addition in the vectors. It is how most people would imagine vector addition is done.
Before we jump in the c++ and CUDA code, we should cover pointers. They are a core concept in programming languages that use memory management. c++ and CUDA use pointers to reference memory locations. An asterix “*” operator is used as a pointer in CUDA and the ampersand “&” operator is used to de-reference a pointer.
The following explains pointers, dereferencing, the * operator and the & operator.
int main() {
    int i;    // i is an int
    int *p;   // this is a * in a type-name. It means p is a pointer-to-int
    p = &i;   // use & operator to get a pointer to i, assign that to p.
    *p = 3;   // use * operator to "dereference" p, meaning 3 is assigned to i.
}
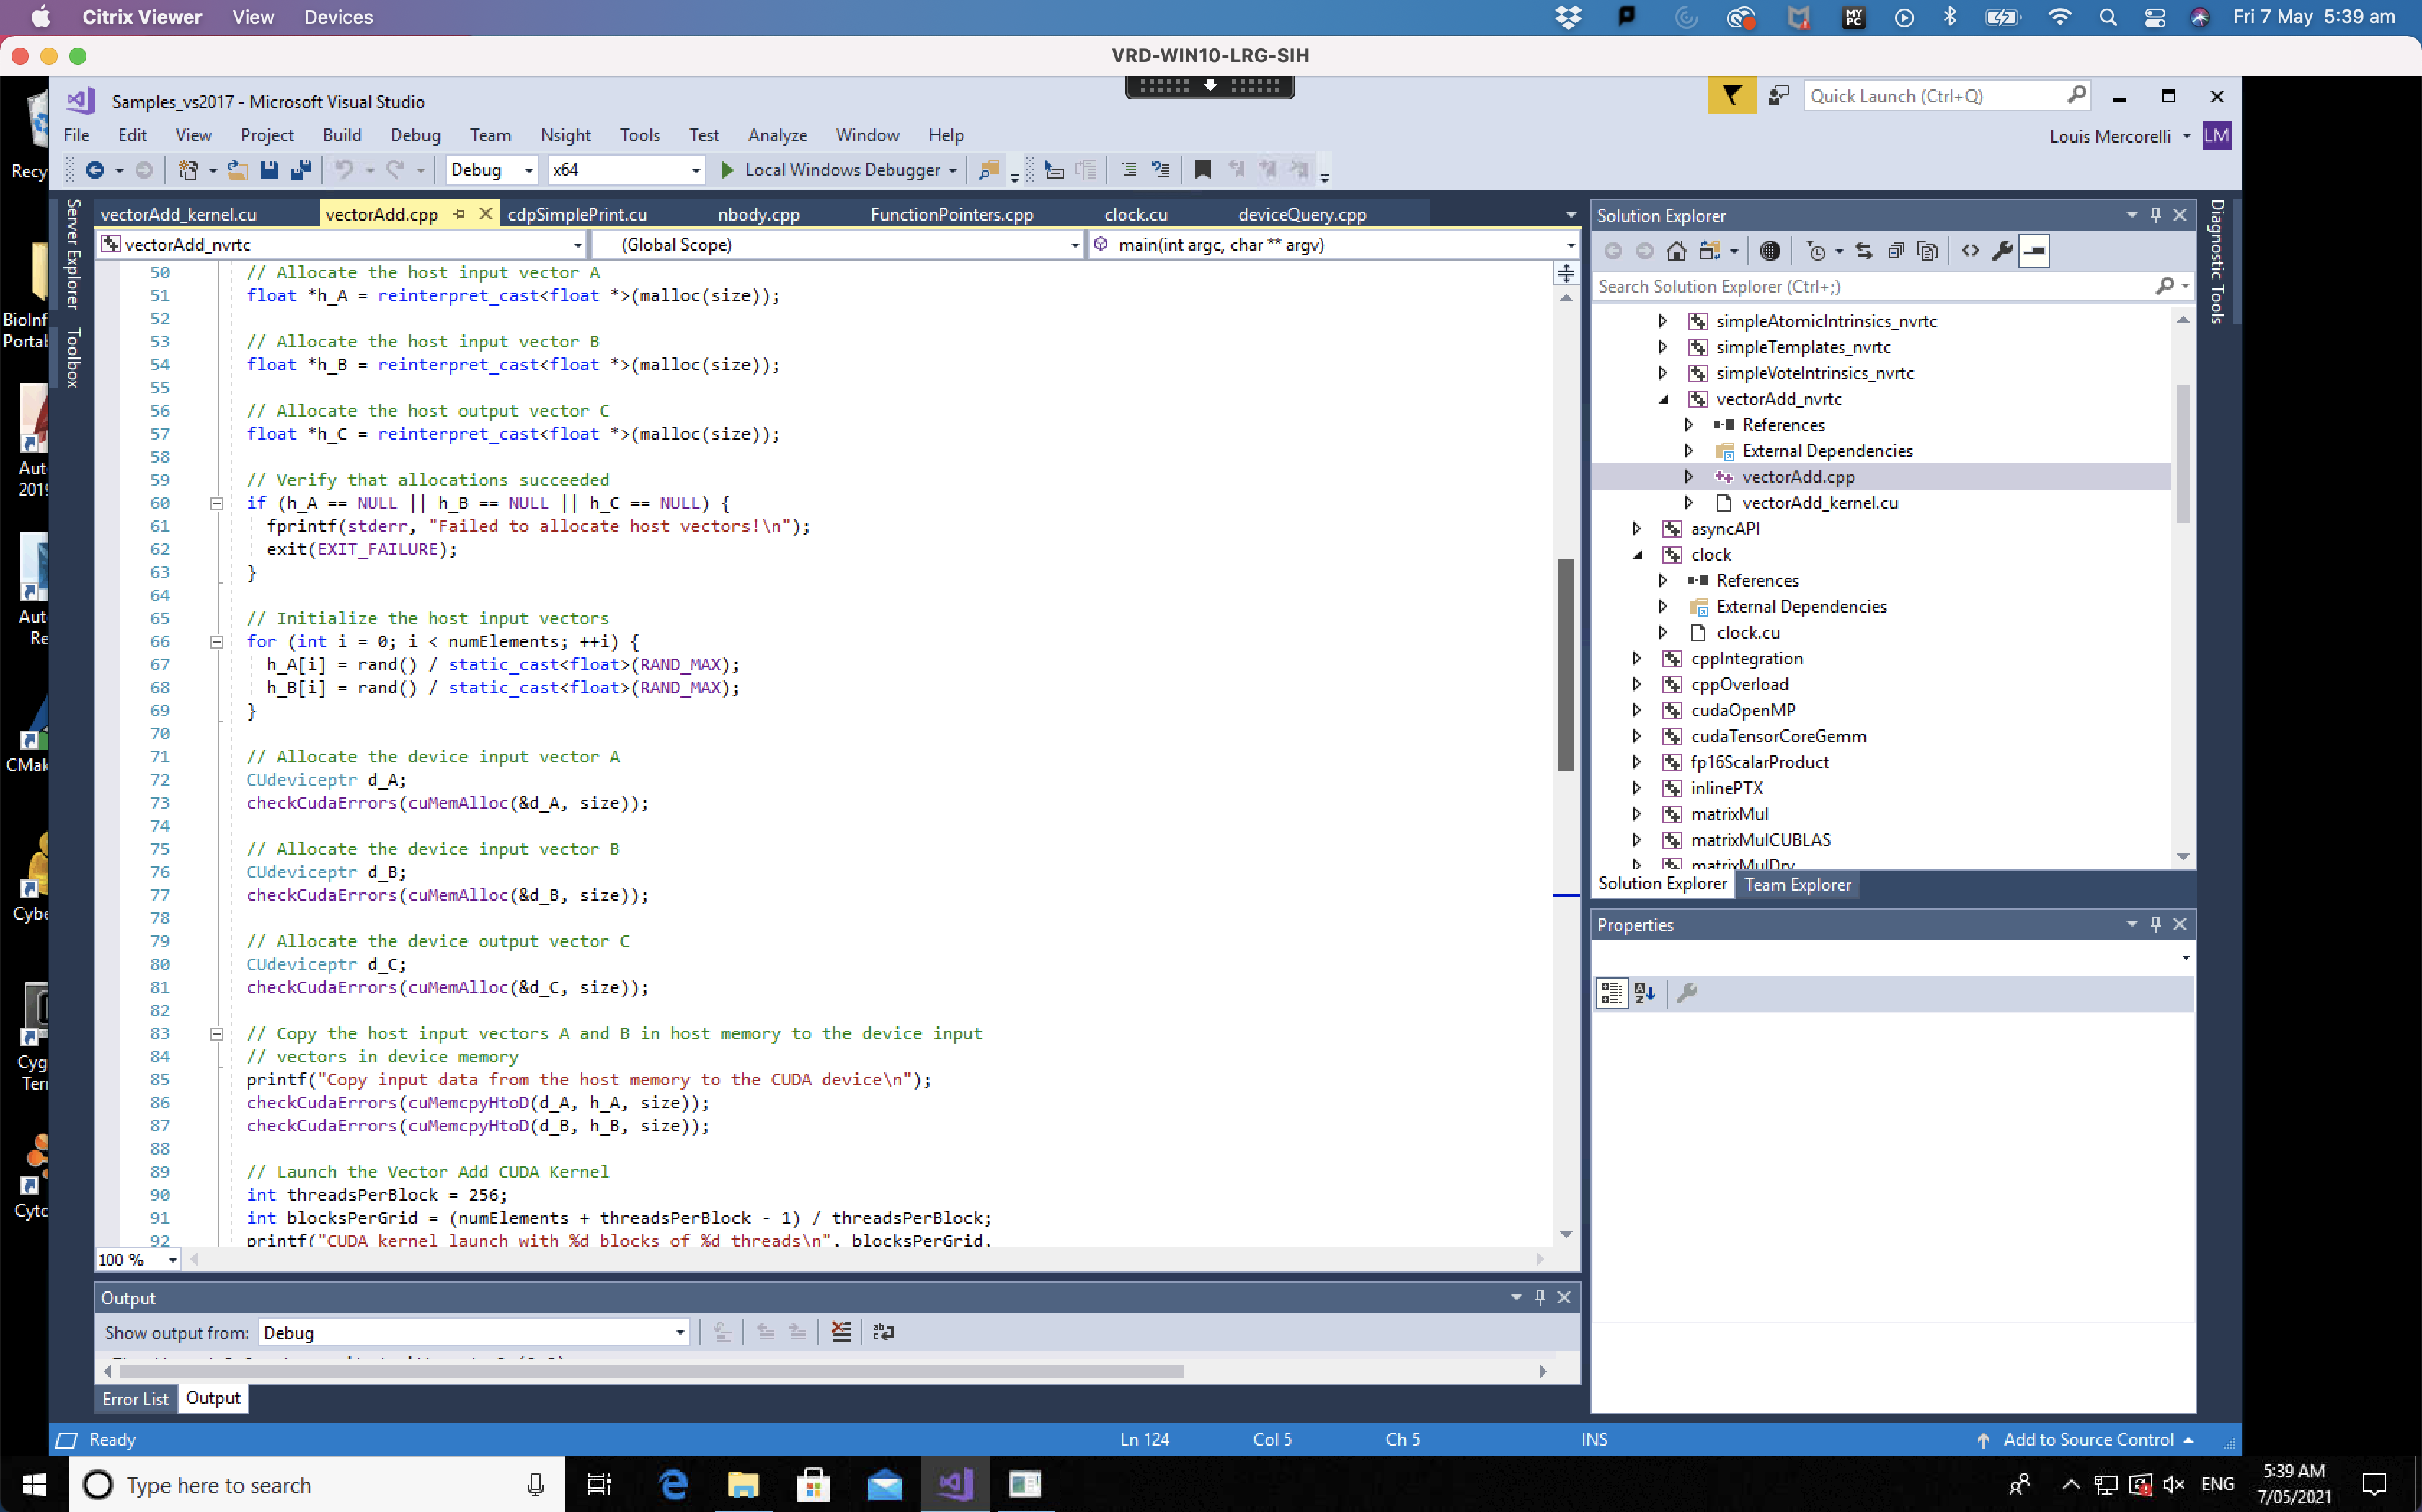
The vector addition project is one of the simplest GPU programs and highlights the key elements required in all CUDA programs. The picture below shows the first few steps in the “vectorAdd.cpp” program, let’s review them:
- Host (CPU) memory allocation (lines 50 to 57)
- Host (CPU) memory initialisation (lines 65 to 69)
- Device (GPU) memory allocation (lines 71 to 81)
- Copy the input data from the Host to Device (lines 83 to 87)
- Launch the kernels on the GPU (lines 89 to 106) (note: the Launch of the kernels continues in the next picture)
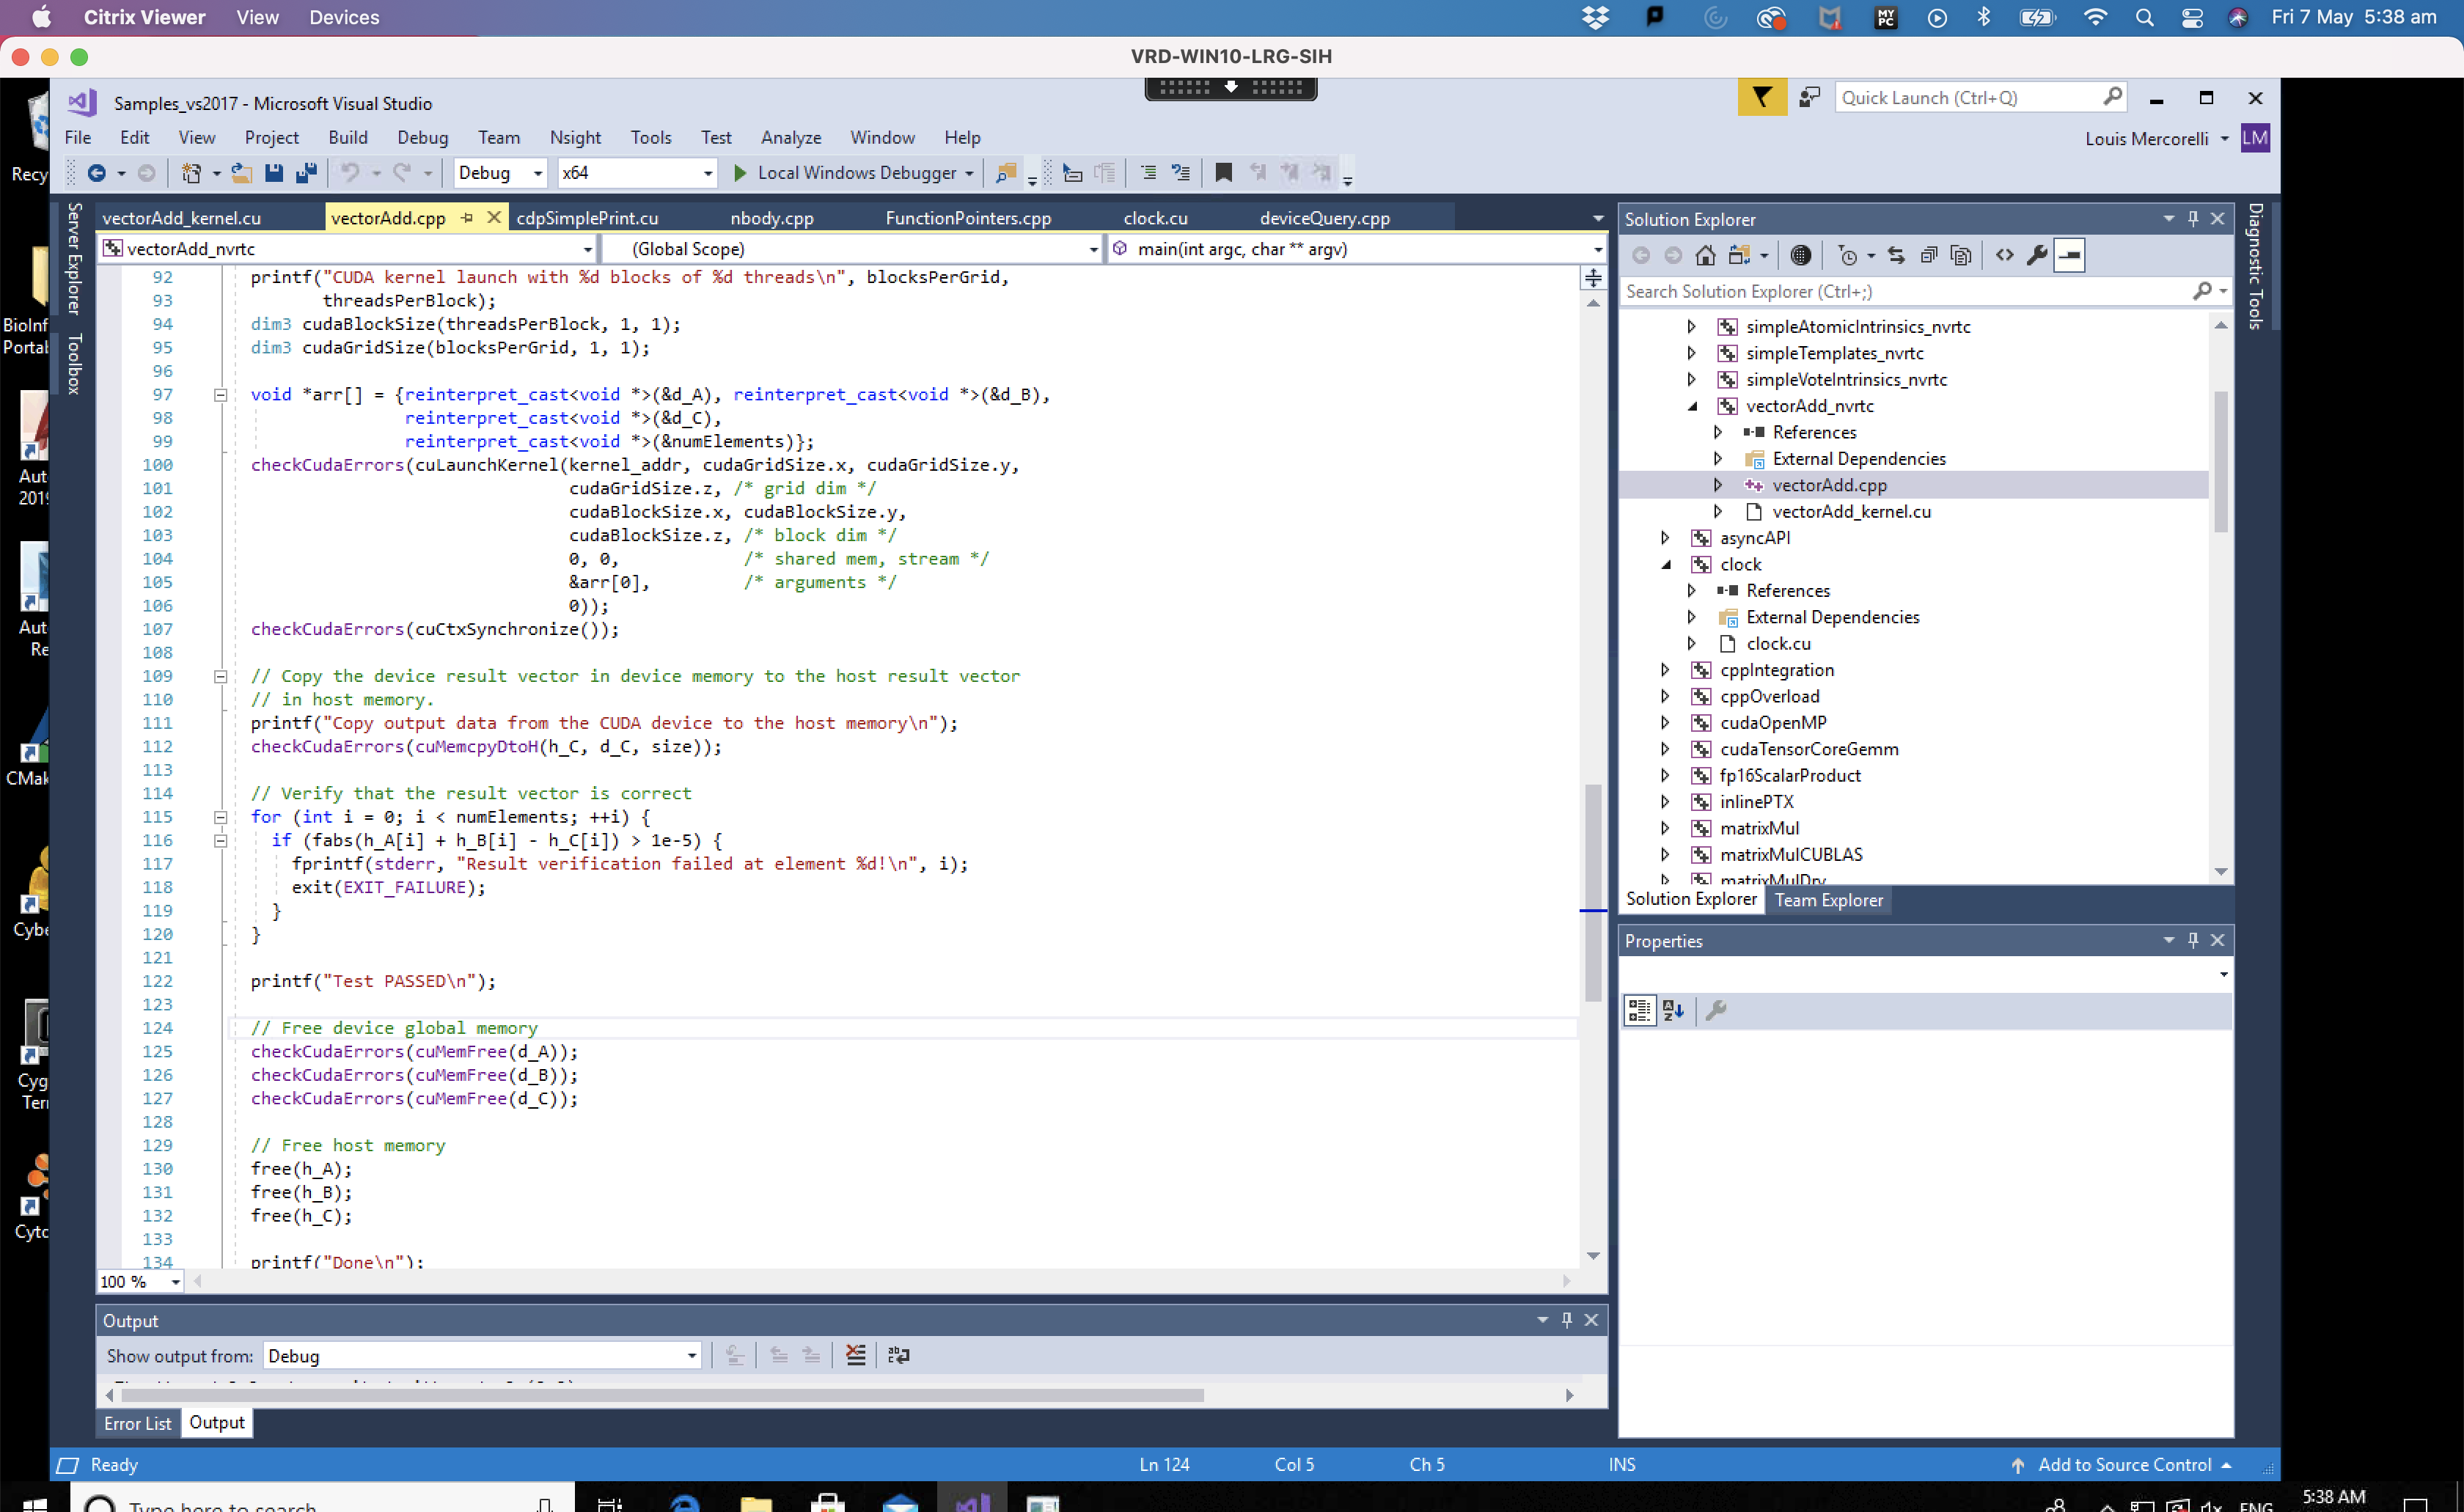
In the picture below we will review the remaining steps including:
- Launch the kernels on the GPU (lines 89 to 106)
- Check for any errors (line 107)
- Copy output data from Device back to Host (lines 109 to 112)
- Check for any final errors and free up Device memory (lines 124 to 127)
- Free up Host memory (lines 129 to 132)
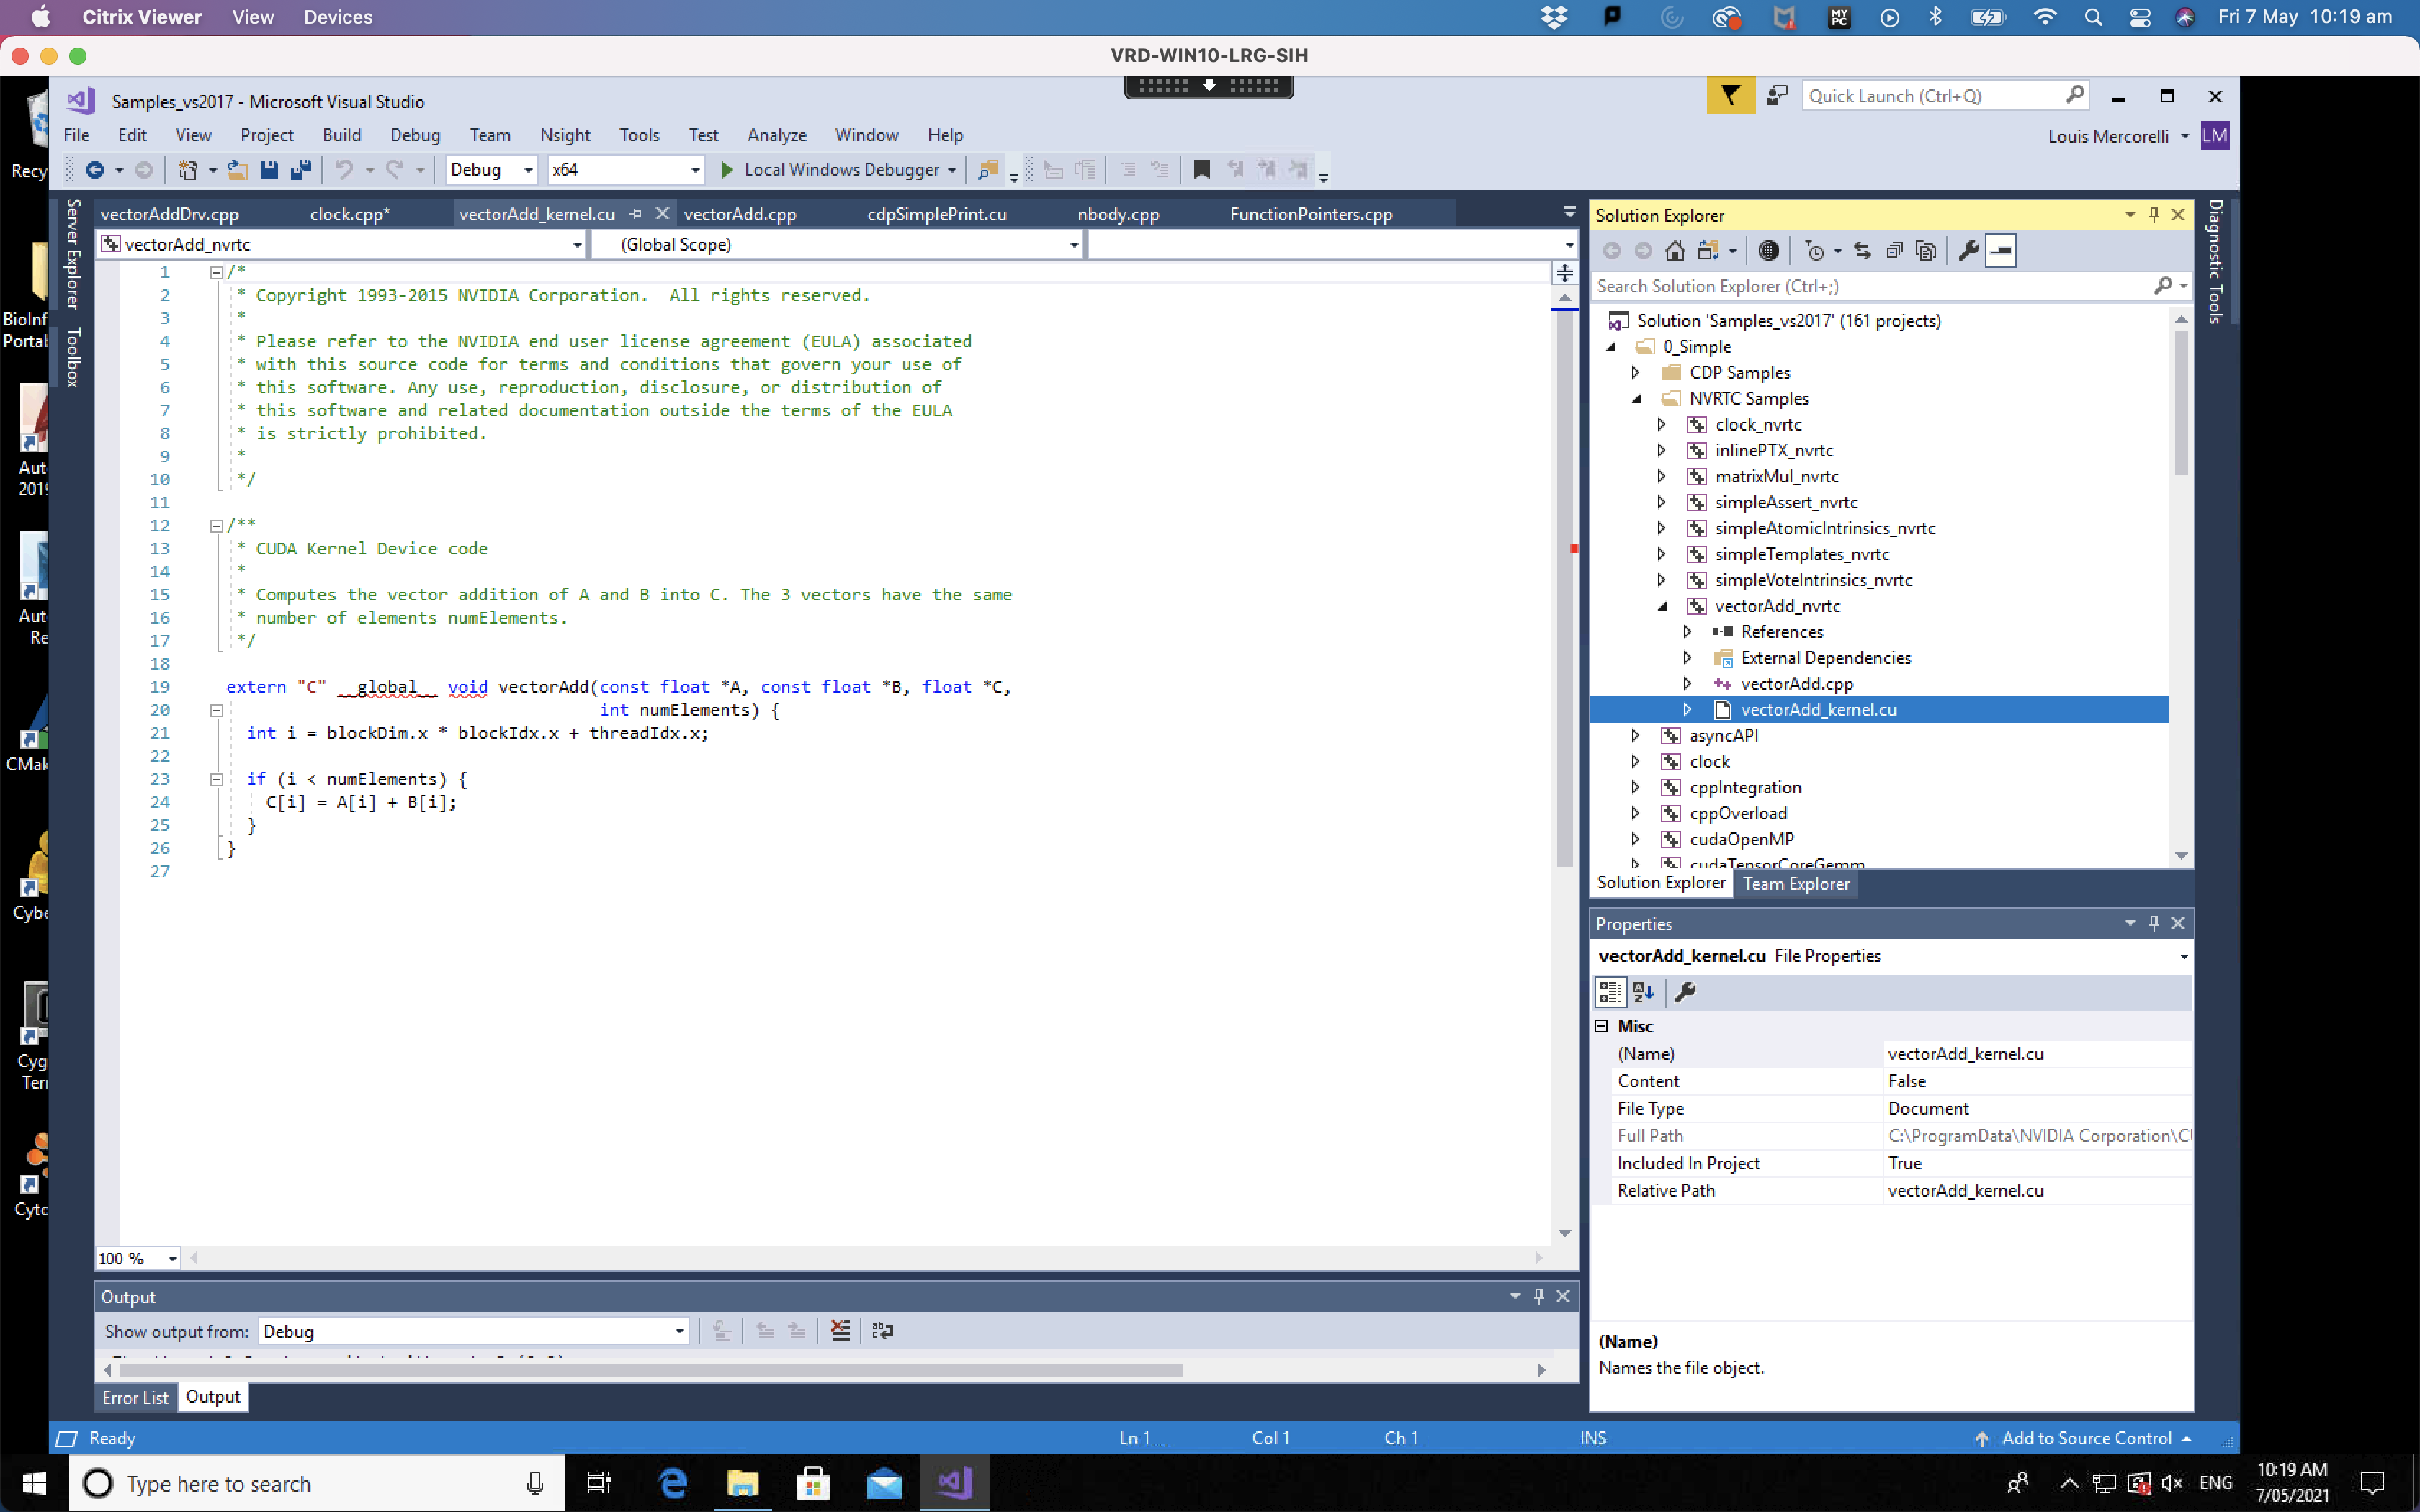
The final bit of code is the kernel code that is run on each of the cores in the GPU. It is “vectorAdd_kernel.cu” in the project and can be identified by “cu” extension which indicates that it is CUDA code.
Notice that the index for each thread is manually calculated using block dimensions, block index and thread index (line 21). It is important for new CUDA programmers to recognise that they will need this memory management task so that each kernel running in parallel accesses the correct data.
Key Points
Input data must be copied from CPU (host) to GPU (device).
Kernels are run in parallel while errors are caught.
Output data must be copied from GPU (device) back to CPU (host).