Parallel Python: multithreading, multiprocessing and parallel python programming for HPC: Setup
1. Get a Python client
We generally use and recommend Miniconda Python distribution: https://docs.conda.io/en/latest/miniconda.html. But feel free to use whatever one works for you. You can do all the exercises on Artemis for the training session, but in the real worl it is best to do offline development so we recommend getting Python working.
2. Python environemnt
To run all the commands today in your own Python installation, you can set up an environemnt with something like this:
conda create -n advpy dask==2.11.0 distributed==2.11.0 netCDF4==1.5.3 numpy==1.18.1 pandas==1.0.1 scipy==1.4.1 xarray==0.15.0 mpi4py==3.0.3 -c conda-forge
Or install driectly from the yaml environment file with:
conda env create -f environment_python.yml
Activate the environemnt with:
conda activate advpy
3. Get access to the HPC
Visit https://dashr.sydney.edu.au/ and make a project, be sure to request Artemis HPC access for the project. Otherwise the ideas and methods we will present today are transferable to national HPC infastructure like NCI or Pawsey or even any cloud providor.
4. Get a shell terminal emulator
To connect to Artemis HPC, and follow this lesson, you will need a ‘terminal emulator’ program installed on your computer. Often just called a ‘terminal’, or ‘shell terminal’, ‘shell client’, terminal emulators give you a window with a command line interface through which you can send commands to be executed by your computer.
A. Linux systems
If you use Linux, then chances are you already know your shell and how to use it. Basically, just open your preferred terminal program and off you go! An X-Window server (X11) may also be useful if you want to be able to use GUIs; again, if you’re using Linux you probably have one, and if you don’t have one, it’s probably because you intentionally disabled it!
Connection to Artemis can be made via ssh by issuing the following command on the shell:
ssh -X <unikey>@hpc.sydney.edu.au
B. OSX (Mac computers and laptops)
Mac operating systems come with a terminal program, called Terminal. Just look for it in your Applications folder, or hit Command-Space and type ‘terminal’. You may find that other, 3rd party terminal programs are more user-friendly and powerful – I use Iterm2.

We also recommend installing XQuartz, which will replace OSX’s native X-Window server. XQuartz has some extra features that may offer better performance when using GUI programs. You’ll need to log out and back in again after installing XQuartz in order for it to activate.
Connection to Artemis can be made via ssh by issuing following command on in the terminal:
ssh -X <unikey>@hpc.sydney.edu.au
C. Windows
If you’re using a Windows machine, don’t panic! You might not have used ‘CMD’ since Windows 95 but, rest assured, Windows still has a couple of terminal programs and shells buried in the Programs menu.
However, those aren’t going to work for us, as you’ll need extra programs and utilities to connect to Artemis, such as an SSH implementation. To use Artemis on Windows, you have a couple of options:
i. PuTTY (Recommended)
PuTTY, an SSH and telnet client, is another good simple option. However, note that PuTTY does not provide an X11 server, so you won’t be able to use GUI programs on Artemis with just PuTTY.
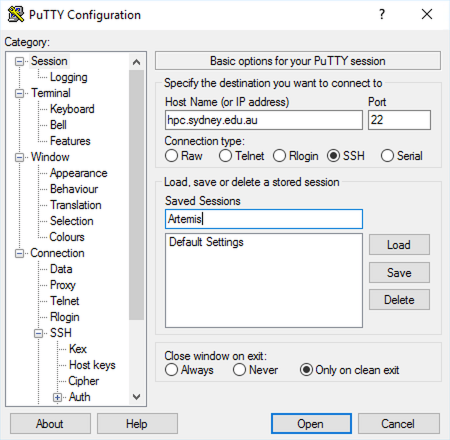
Head to https://putty.org and download PuTTY. You can install it to your computer, or just download the ‘binary’ and run it directly. Create a new session for use with Artemis as follows:
- Fill in the connection details:
- Host Name: hpc.sydney.edu.au
- Port: 22
- Connection type: SSH

- Name this session “Artemis” and click ‘Save’
ii. X-Win32
X-Win32 is full-featured X-server and terminal emulator for Windows. USyd provides a license for it; however, the download link is restricted to staff so, students. Install, and follow the instructions on the USyd-ICT page to activate – you’ll need to be on the USyd network or VPN to do so.
iii. WSL and Ubuntu
Install Ubuntu or some other Linux distro on the Windows Subsystem for Linux see here for details. This one will give you a full suite of Linux functions and I like it for emulating Linux.
5. Off-campus access
If you’re attempting this training by yourself, or following on Zoom, off-campus then you’ll need to connect to the USyd internet network before you can connect to Artemis.
There are a couple ways to do this:
A. The USyd VPN
VPN (Virtual Private Network) is a protocol that allows you to tap into a local private network remotely. Follow USyd Service Now instructions on the Cisco Any Connect VPN. Once you’ve connected to the VPN, the above connection methods will work, just as though you were on-campus.
B. Use the Artemis Jump server
Artemis provides a ‘gateway’ server, called Jump, that allows connections from outside the University network, and is itself on the network. From the Jump server, you can then connect to Artemis directly. If using the Jump server, you will need to edit the host address used in the instructions above:
- Instead of hpc.sydney.edu.au use jump.research.sydney.edu.au
This will connect you to Jump, rather than Artemis itself. You can then connect to Artemis directly via SSH. See Episode 1 of the Introduction to Artemis HPC course.