Welcome back to Artemis HPC
Overview
Teaching: 15 min
Exercises: 0 minQuestions
Who are the Sydney Informatics Hub?
Objectives
Connect to Artemis.
Run an interactive job on Artemis
This episode introduces the Sydney Informatics Hub, and returns us to Artemis HPC.
The Sydney Informatics Hub
The Sydney Informatics Hub (SIH) is a Core Research Facility of the University of Sydney. Core Research Facilities centralise essential research equipment and services that would otherwise be too expensive or impractical for individual Faculties to purchase and maintain. The classic example might be the room-size electron-microscopes, built into specialised rooms in the Sydney Microscopy & Microanalysis unit.
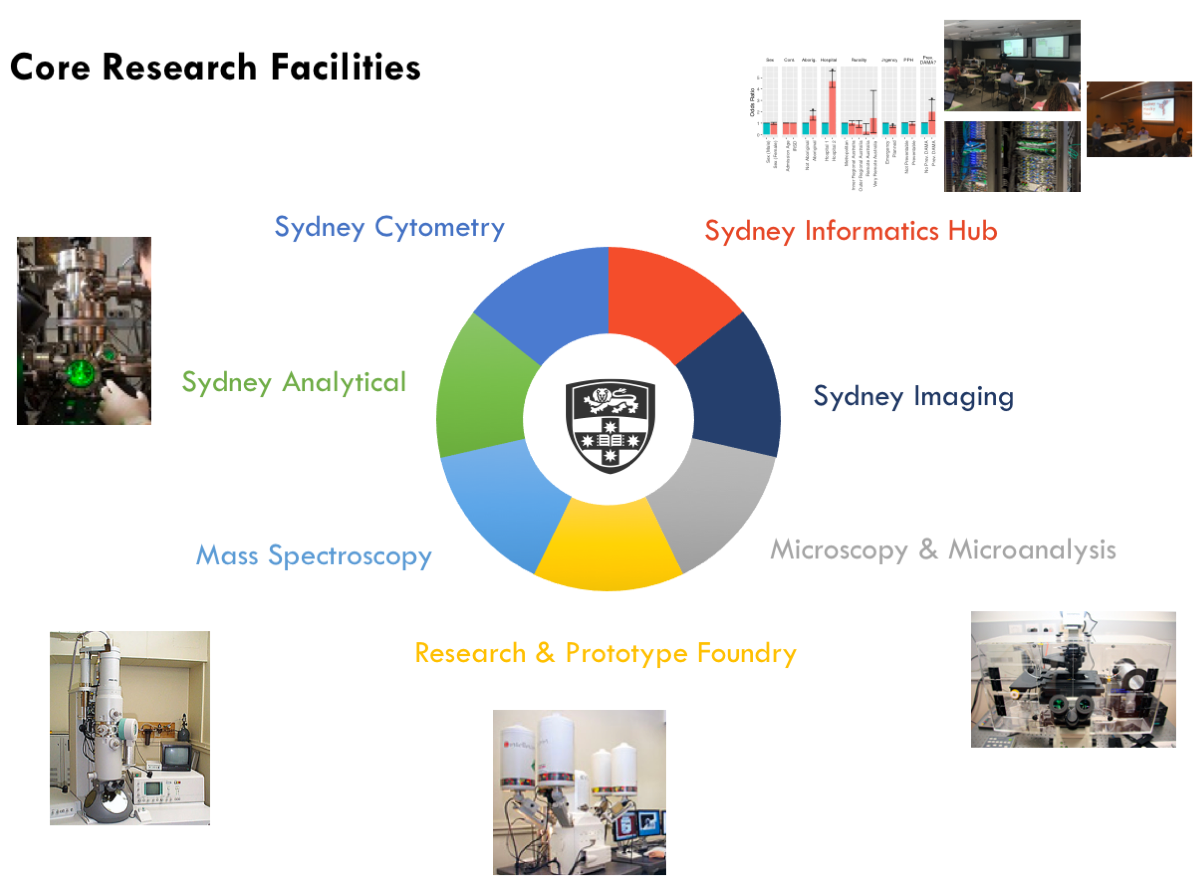
Artemis HPC itself is a multi-million dollar set of equipment, a ‘supercomputer’, and is the main piece of equipment supported by SIH. However, we also provide a wide range of research services to aid investigators, such as:
- Training
- Statistics consulting
- Modeling/Simulation/Visualisation consulting and platforms
- Bioinformatics consulting
- Research Data Management consulting and platforms
- Data Science & Research Engineering project work
We also aim to cultivate a data community at USyd, organising monthly Hacky Hours, outside training events (eg NVIDIA, Pawsey Center), conferences, and data/coding-related events. We are currently running a quarterly Publication Incentive contest, with $2000 worth of prizes for the winning peer-reviewed publications submitted to us, which both use our services and acknowledge them.
Connect to Artemis
If you followed the Setup instructions, then you should already have the required software installed. If not, please go do this now!
Connect via SSH in a terminal (recommended)
Fire up your terminal emulator and connect to Artemis HPC via SSH. When you use Artemis for your research, these will be your Unikey and Unikey password; however, for this training course we’ll be using training accounts, which are:
- Username: ict_hpctrain<N>, with N from 1-20 (replace <N> with your assigned number)
- Password: will be written on the whiteboard!
ssh -X ict_hpctrain<N>@hpc.sydney.edu.au
or, if using XQuartz on a Mac
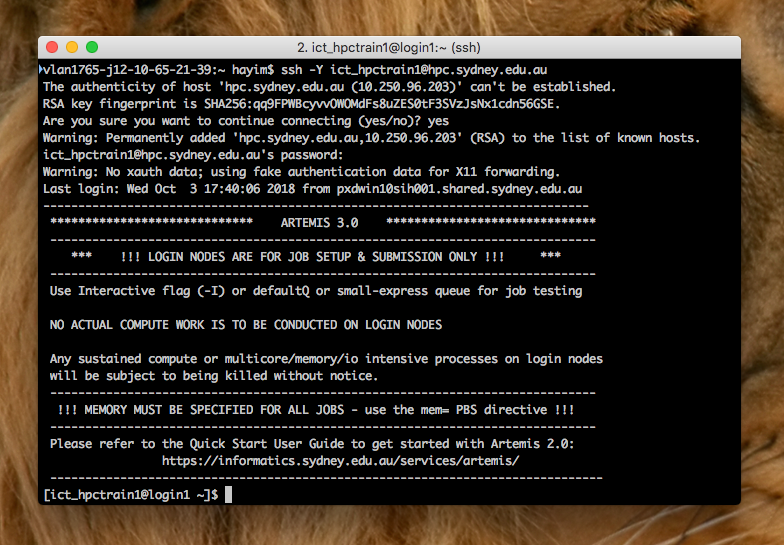
ssh -Y ict_hpctrain<N>@hpc.sydney.edu.au
The -X or -Y flags tell ssh to enable X-forwarding, which lets GUI programs on Artemis serve you graphical windows back on your local machine.
If connecting for the first time on this machine, you may get the following output, requesting authorisation to connect to a new host server:
The authenticity of host 'hpc.sydney.edu.au (10.250.96.203)' can't be established.
RSA key fingerprint is SHA256:qq9FPWBcyvvOWOMdFs8uZES0tF3SVzJsNx1cdn56GSE.
Are you sure you want to continue connecting (yes/no)?
Enter ‘yes’. You will then be asked for your password: type it and press ‘enter’, and you should then be logged in!
Connecting via an SSH GUI (common for Windows users)
If you’re on Windows, and followed the Setup guide, then you will likely be connecting through an X-window or shell client program, like ‘X-Win32’ or ‘PuTTY’. Following the instructions in the Setup guide:
- Open your installed program
- Select the “Artemis” session you configured earlier
- Click ‘Launch’ (X-Win32) or ‘Open’ (PuTTY)
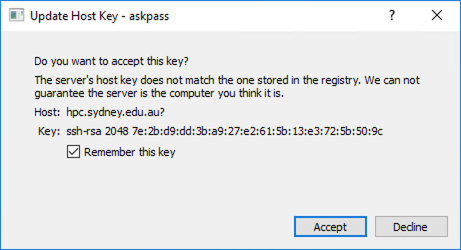
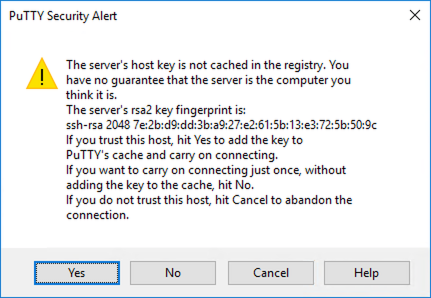
If this is the first time connecting to Artemis, you will be asked to authorise it as a trusted host server; click ‘Accept’ (X-Win32) or ‘Yes’ (PuTTY).
-
If using ‘X-Win32’, enter your password and once entered, a terminal window connected to Artemis should open.
-
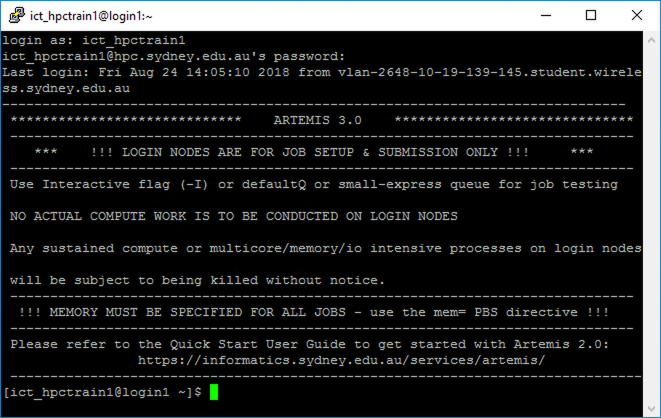
If using ‘PuTTY’, enter your username, and then your password in the terminal window that appears. You should now be logged in to Artemis.
Get the input data
We’ll now retrieve the data we’ll use for the examples in this course. Since it won’t take very long, we’ll also use this as an opportunity to demonstrate an interactive PBS job on Artemis, rather than the batch (script) jobs we performed in the ‘Introduction to Artemis HPC’ course.
Interactive jobs
Interactive jobs give us access to a terminal window on an Artemis compute node – as opposed to the login nodes that we have all just logged in to. Normally, we’d need to wait a while for an interactive job to start, however since we are only doing data transfer operations (eg getting our input data ready) we can use the data transfer queue (dtq), and hence shouldn’t have to wait too long.
First, change to your project directory. Since we are using the Training account, that will be the Training PROJECT
cd /project/Training
Now request an interactive job (-I):
qsub -I -P Training
For the workflow we are currently doing you would probably want to use qsub -I -P Training -q dtq, but in the training environment dtq is only available to one person at a time! So we just use the default training queue (by not specifying which queue to use.)
[jdar4135@login1 Training]$ qsub -I -P Training
qsub: waiting for job 2595948.pbsserver to start
qsub: job 2595948.pbsserver ready

[jdar4135@hpc242 ~]$
The last two lines will appear when your interactive job has connected. Note that the host indicated at the command prompt has changed:
[jdar4135@hpc242 ~]$
You should no longer be on a login node but instead on one of Artemis’ compute nodes, in this case it was hpc242. Note also that I’ve once again been moved to my /home directory (~), which you may recall is the default behaviour when logging in to an Artemis machine.
Move back in to your project folder. Remember that we were in our project folders when we submitted our qsub request, so you might also remember that because we are now technically inside an Artemis job, the PBS system will have defined certain environment variables for us. Can you think of one that might be relevant right now?
Answer
The PBS variable PBS_O_WORKDIR records the directory you were in when you called qsub.
Check this with
echoecho $PBS_O_WORKDIRNow use this variable to return to your project folder.
cd $PBS_O_WORKDIR
Now that we have returned to our project folders, create yourself a personal directory in which to work in and change in to that directory:
mkdir hayimdata
cd hayimdata
(You can use many shortcuts in unix, like the command above could be done in one line with mkdir hayimdata && cd !$. Where && means ‘and then do’ and !$ is a Bash shortcut referring to the last argument of the previous command.)
Now, download and extract the data archive below:
tar -zxvf /project/Training/DATA/Automation.tar.gz -C /project/Training/hayimdata
You should see quite a bit of output, hopefully resulting in a successful download and extraction.
<snip>

HTTP request sent, awaiting response... 200 OK
Length: 1810727404 (1.7G) [application/octet-stream]
Saving to: “Automation.tar.gz”

100%[===============================================>] 1,810,727,404 32.7M/s   in 53s

2018-11-15 12:25:37 (32.4 MB/s) - “Automation.tar.gz” saved [1810727404/1810727404]


<snip>

Automation/Alignment/equcab2_chr20.fasta.pac
Automation/Alignment/equcab2_chr20.fasta.fai
Automation/Alignment/canfam3_chr20.fasta.fai
Automation/Alignment/equcab2_chr20.fasta.bwt
Automation/Alignment/canfam3_chr20.fasta.ann
Automation/Alignment/FM0238_D1A03ACXX_GATCAG_R2.fastq.gz
Automation/Alignment/CMW_USCF70_D09NUACXX_R1.fastq.gz
Automation/Alignment/BD394_C7RNWACXX_ATTCCT_L001_R2.fastq.gz
Automation/Alignment/BD394_C16NWHCXX_ATTCCT_L002_R1.fastq.gz
Finally, we can now exit our interactive job:
exit
[jdar4135@hpc242 hayimdata]$ exit
logout

qsub: job 2595955.pbsserver completed
Key Points
Recall how to connect to Artemis HPC
Recall the difference between batch and interactive jobs
Recall the special Data Transfer Queue