The Run:AI Command Line Interface (CLI)
The Run:AI Command Line Interface (CLI) is a tool that allows researchers to manage and run workloads directly from the terminal. It provides commands to submit, monitor, and control jobs on the SIH GPU cluster, as well as to manage projects, resources, and configurations. Using the CLI, users can interact with Run:AI’s platform without needing to access the graphical interface.
Setting up the Run:AI CLI
To set up the CLI in your terminal:
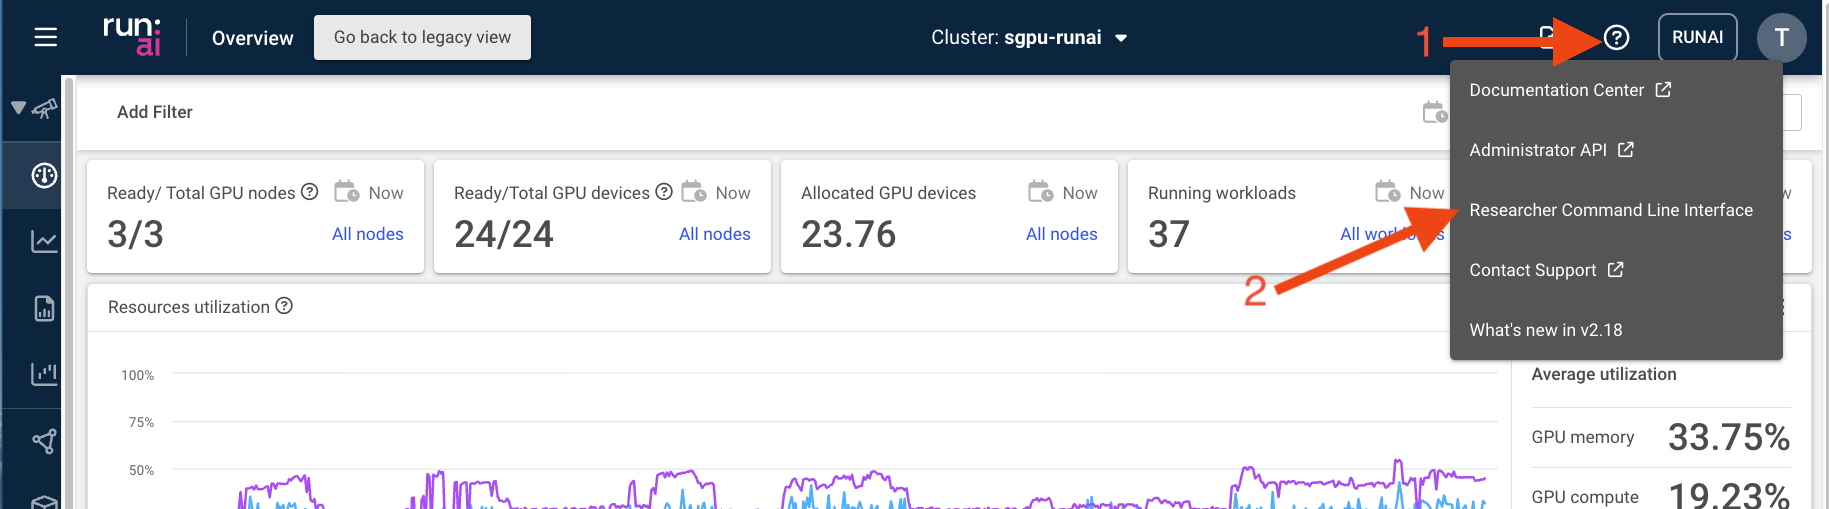
- Log into the Run:AI web interface and select the ‘Researcher Command Line Interface’ from the drop-down menu under the ‘?’ icon in the top right.
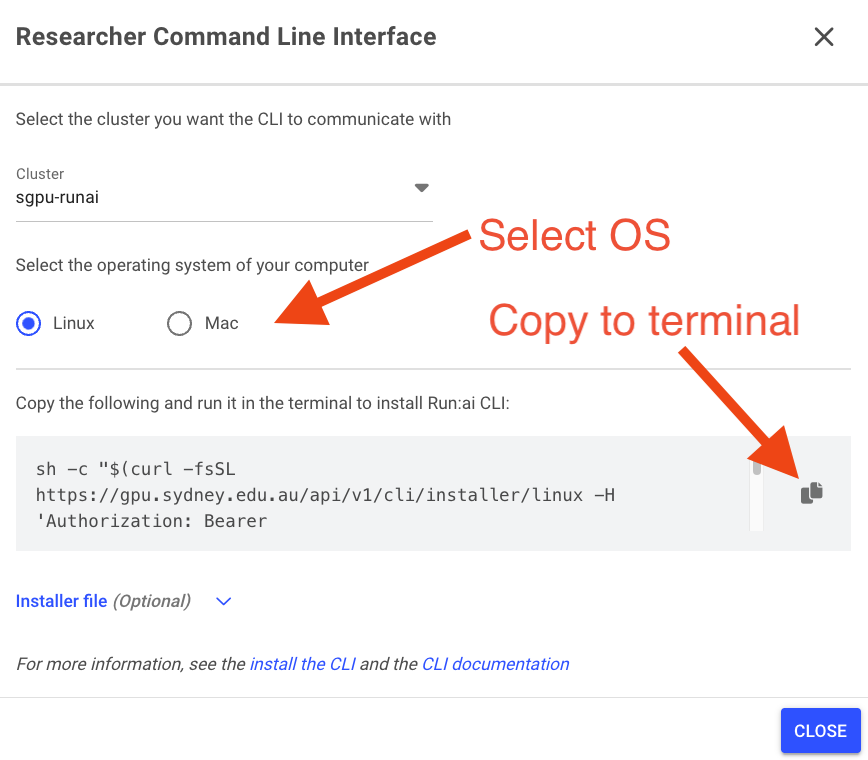
- Select your preferred operating system and copy the command indicated in the box using the icon on the right - then paste this command into a terminal session on your local machine.
- Follow the prompts in your terminal to set up the CLI. Once complete you should now be able to start the CLI in a terminal using
runai loginat the command line.
Once the Run:AI CLI is set up - you can start a workflow by running a saved docker image of your choice. SIH have provided base docker images with a pre-installed set of common dependencies for GPU (sydneyinformaticshub/dgx-interactive-gpu) and CPU (sydneyinformaticshub/dgx-interactive-cpu) workflows on dockerhub, including basic packages for interactive use (e.g. ipython).
How to Run a Terminal Environment at the Command Line
You can start a workload from a terminal session on your own laptop as long as you are connected to the University VPN. You can run this interactively which provides a simple terminal environment running inside the SIH GPU cluster.
Example running a GPU workflow using the CLI
- Login to the Run:AI CLI at the command line:
runai loginyou will be prompted for your password and Okta credentials in a browser window during this step.
- Set your project (replace
<my project>with the name of your project):
runai project set <my_project>- To run an
sydneyinformaticshub/dgx-interactive-terminalcontainer with an interactive terminal session including mounting your projects existing PVC in /scratch inside the container you can use the following command (be sure to replace everything in brackets<...>with values specific to your requirements):
runai workspace submit <workspace-name> --image sydneyinformaticshub/dgx-interactive-terminal --gpu-devices-request 1 --cpu-core-request 1.0 --run-as-user --existing-pvc claimname=<pvc-name>,path=/scratch/<my_project> --pod-running-timeout 10m --attachHere is a brief rundown of the arguments of the command above:
runai workspace submit <workspace-name>will run a new workspace and give it the name specified in<workspace-name>--image sydneyinformaticshub/dgx-interactive-terminalwill run the base Docker image located atsydneyinformaticshub/dgx-interactive-terminal, you can replace this image with your own, perhaps built yourself with extra package installs and using this image as a base--gpu-devices-request 1 --cpu-core-request 1.0requests 1 GPU and 1 CPU for the workflow. There are multiple options for selecting GPU and CPU RAM and devices, see here or userunai workspace submit --helpfor a full list of options--run-as-userwill run the workflow using your user id and group ids inherited from DashR for your project. These will be the user and groups for the account you logged into Run:AI with in step 1 above. You should normally use this option otherwise user and group ids may not be set up correctly inside your workspace--existing-pvc claimname=<pvc-name>,path=/scratchwill mount an existing PVC associated with your project into the running workload. Replacewith the name of your PVC. This will mount the PVC into /scratchinside the running container - you can change this mount point to whatever you prefer inside the running workload. You can also omit this flag entirely if you do not intend to use a PVC in your workspace.--pod-running-timeout 10mwill wait 10m for the pod to start running. Sometimes - especially when mounting a PVC into your container - the workflow can take a couple of minutes to start running.--attachwill run the container and attach to it, which in this case will provide an interactive shell session inside it.
Run a workflow in the background and connect to it using the CLI
Using the CLI it is also possible to set up a workflow that persists in the background. You can then connect to it whenever you like or as many times as you like - this is a useful option if you want to reserve resources that you can keep available as you require or you want to share resources interactively amongst multiple users.
To set this up follow the steps 1 and 2 above, then change the command in step 3 to:
runai workspace submit <workspace-name> --image sydneyinformaticshub/dgx-interactive-terminal --gpu-devices-request 1 --cpu-core-request 1.0 --run-as-user --existing-pvc claimname=<pvc-name>,path=/scratch --command -- bash -c 'trap : TERM INT; sleep infinity & wait'This will run the workload and keep it persisting in the background. You can then connect to this container whenever you like using:
runai workspace bash <workspace-name>you can use this method to connect to any running workspace on the cluster as well as connect multiple terminals inside the running workspace.
Make sure you terminate the background workspace when you are finished. You can do this using:
runai workspace suspend <workspace-name>to suspend the workspace so you can restart it again later or
runai workspace delete <workspace-name>to delete the workspace entirely. Please note that when deleting the workspace you will lose all data inside it not saved to a mounted PVC.