Transferring data to and from Gadi
Introduction
In this section, we will look at transferring data between the Research Data Store (RDS) and Gadi. There is a lot of content with step-by-step examples here due to the numerous methods available for data transfer.
Watch the pre-recorded session
The table below summarises the data transfer methods covered in this section:
| Method | Suitable data size/type | Pros/Cons |
|---|---|---|
GUI based data transfer client e.g. filezilla or cyberduck |
Only small files, configuration scripts, etc. |
|
| sftp transfer from Gadi terminal | Files up to a few GB. |
|
| sftp copy using copyq | Large files and datasets to copy all in one go. |
|
| lftp sync using copyq | Large datasets with many files, with only a few files updated during each transfer. |
|
| Globus | Any file or dataset size. |
|
Where to put project files on Gadi
On Gadi you have access to a number of different storage areas for project files and data. Check the NCI User Guides for more detailed information. Here we provide a brief introduction for those familiar with the recently decommissioned Artemis HPC.
Each space is intended for use in a specific way:
/home
Your home space (/home/<nci_user_id>) is owned by you and has 10 GB of available space. This cannot be increased.
Your home directory is backed up, and should only be used to store things like program code, batch scripts or software configuration information. Note that as space is extremely limited here it is unadvisable to use this space for storing project data.
/scratch
Your scratch space (/scratch/<project>) is owned by your project and has 1 TB of available space which can be increased upon request to NCI.
Data are not backed up and files not accessed for 100 days will be quarantined for 14 days and then removed (See here for instructions for removing files from quarantine).
Scratch should be used for temporary files associated with a job that has large data IO and not for longer term storage. Always ensure any data you need from a job that is left in /scratch is promptly backed up to the Research Data Store.
/g/data
Your /g/data space (/g/data/<project>) is owned by your project and has the available space allocated by the Sydney Scheme Manager.
The files on /g/data are not backed up but they will persist there for the lifetime of your project.
/g/data is intended to be used to store longer term files that are regularly used by your project during its lifetime. Always ensure your data is regularly backed up from here to the Research Data Store.
/g/data may be accessed directly from PBS job scripts by using the -lstorage PBS directive.
To check the amount of disk space you have available in the data areas listed above you can type the command lquota at the Gadi prompt.
Research data store (RDS)
The RDS was NOT decommissioned along with Artemis HPC. Any RDS projects you currently have will persist on RDS.
In this section, we will mainly focus on how to transfer data between Gadi HPC and RDS. You should be able follow similar methods for copying data between your own laptop/server and Gadi.
Data transfer options
Depending on the size and complexity of the data you are transferring you have multiple options available:
For small transfers (<1 GB) you can use a GUI based data transfer client such as
filezillaorcyberduck.For mid sized transfers up to tens of GB you can use terminal based transfer.
For large transfers you should use the data transfer queue on Gadi (
copyq) or Globus.
All data transfer to and from Gadi should be made using the “Data Mover Node” at gadi-dm.nci.org.au where possible rather than the login nodes. This ensures that data transfer will not consume otherwise limited resources on the login nodes.
Globus
Globus is a data transfer and sharing platform designed to move large volumes of data securely, easily, reliably, and automatically between RDS and other storage connected to the Globus service is a data transfer service that makes it easier to copy data around.
Instead of data transfers running on your local computer, you submit data transfer requests to the Globus service, and the data transfers happen on Globus servers independently of your local computer. Globus can verify all data is successfully transferred and retry transfers until they succeed.
Globus is simple to use, and data transfers can be initiated via an intuitive web app or the command-line.
For comprehensive information on using Globus, please visit our technical guide:
Requesting Globus for your project
The lead chief investigator of each project must review the Privacy Collection Notice and decide if they would like to use Globus for their project.
Requesting the Globus data movement service for your Research Data Store (RDS) projects is done within DashR. The Globus ‘endpoint’ is then provisioned by ICT. Refer to the To and from RDS with Globus page for more information.
To use Globus to transfer data to and from your NCI project, you can request an endpoint on /g/data from the NCI helpdesk. Please refer to our guide for transferring to and from /g/data for more information.
To transfer between NCI Gadi’s /scratch space, you can easily establish your own personal endpoint on Gadi.
Using the Globus web interface
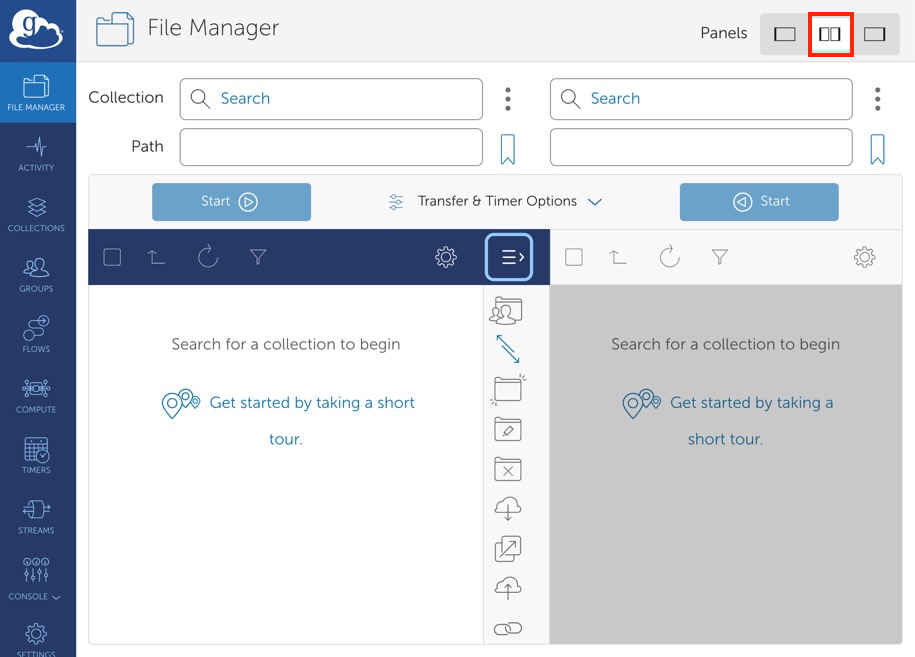
The simplest way to use Globus is via the web interface. You can log in to the web interface with your University of Sydney credentials and then set up a transfer between RDS and Gadi using the “Endpoints” for RDS and Gadi. To do this:
Sign in to the Globus web app as shown in the screenshots here (https://sydneyuni.atlassian.net/wiki/spaces/RC/pages/3492052996/Globus+technical+guide#Web-app).
In the ‘Collection’ search box on the ‘File manager’ tab, search for your NCI endpoint.
- For NCI-managed
/g/dataendpoints, type your NCI project ID and select the collection, eg “NCI USYDNEY nci-project-id”. This will open/g/data/(your storage on NCI) in the left-hand pane. - If you are using a personal
/scratchendpoint, search for the name you assigned this collection during setup. This will open your Gadi/homedirectory, as shown by/~/within thePathfield. To navigate to the/scratchspace for any project you are a member of, over-write the path with the desired scratch path and press the enter key. - Note that you can access
/scratch,/g/dataand your home directory from a personal/scratchendpoint, but you can only access/g/datafrom an NCI-managed/g/dataendpoint.
Note: you may be required to give consent for Globus to access your NCI and RDS storage the first time you use it. This is a one-time process and you will be prompted to log in to each service and give consent for Globus to access the data on your behalf. You can revoke this access at any time via your account settings on the Globus web app. You may need to refresh the two-pane page after granting consent in another window.
On the right-hand pane search box, enter
PRJ-and select the appropriate collection, eg “PRJ- on Sydney RDS (off-campus transfers)”. This will open your RDS project folder in the right-hand pane (Note: because NCI is not located at the University of Sydney, you will always need to use the”off-campus” option for NCI).You can then drag and drop data between these 2 endpoints. Globus will ensure that your files are copied properly in full (using an md5sum) and will retry any failed transfers until they succeed. You will receive an email from Globus when the transfer has completed, with status and other details of the transfer.
Note: If you only see one pane/panel, switch to 2-panel view via the icon on the top right.
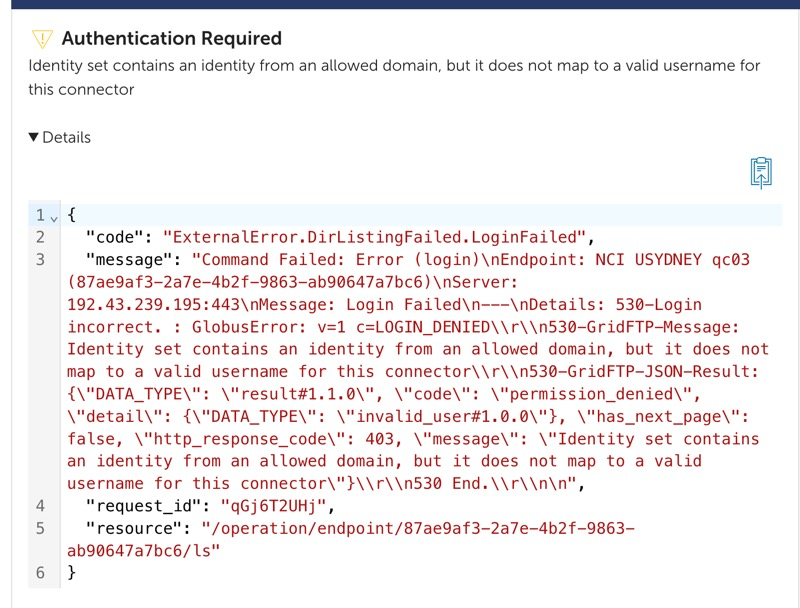
If you get an error similar to the below after granting consent, you need to reach out to NCI support to:
- Ensure that you have access to the NCI project.
- Have your NCI username mapped to your Globus ID.
Using the Globus command line utility
To use the Globus command line utility, install the globus CLI tool following our installation and authentication guide.
Please visit the following Globus material for Globus CLI usage instructions:
Transfer using RDS mapped network drive and data transfer client
For smaller files or datasets, for example a set of scripts that you are going to run, you can map your RDS project as a network drive and transfer the data to Gadi via an intermediate data transfer client GUI such as filezilla or cyberduck.
While simple to use, these are not recommended for large data transfers, as the local computer becomes a bottleneck and they are generally not resumable after interruption. Faster speeds will be obtained if you are on campus, but still this method may be prohibitively slow for larger datasets.
cyberduck
The following are instructions using the cyberduck data transfer client. The process using filezilla is similar with the same username and server IP address as shown in this example.
To mount your RDS drive in either Windows or MacOS, please follow the instructions described here. You should have a File Explorer (Windows) or Finder (MacOS) window open and displaying the files and folders in your RDS project directory.
Next download cyberduck from https://cyberduck.io and open it and connect to Gadi:
- Click on the
Open Connectionicon at the top of the window. - Select SFTP (SSH File Transfer Protocol) from the drop-down menu at the top of box.
- In the Server field, enter
gadi-dm.nci.org.au. - In the Username field, enter your NCI Username.
- In the Password field, enter your NCI password.
- Click Connect.
- If an Unknown fingerprint box appears, click the Always check box in the lower-left hand corner, then click Allow.
If you have successfully logged in, you will see a directory listing of /home/<user_login>. You can browse to your project folder either in /scratch or /g/data by pressing Ctrl + g and then typing /scratch/<project_id> or /g/data/<project_id>.
You can then transfer data to and from RDS and NCI by dragging and dropping files between your computer’s file explorer and the Cyberduck window.
Transfer from Gadi terminal to/from RDS
You can use commands in your terminal application (Mac and linux: Terminal, Windows: Windows Terminal or Powershell equivalent) as an alternative to graphical applications.
Since the connection will be terminated if your computer sleeps, terminal crashes, network drops out etc, this method is not particularly robust for large transfers. Large transfers should use the queue based method (copyq on Gadi) or Globus, each described below.
Transfers from a terminal on Gadi
Due to stringent security settings around RDS, familiar commands like rsync or scp cannot be initiated from NCI Gadi login nodes. Instead you have to use commands like sftp to copy the data.
Please note that running these commands on the login nodes is not the recommended way to transfer research data to Gadi! For smaller downloads, this is OK, but for normal purposes the use of Gadi’s copyq and data mover nodes are the appropriate tools.
To transfer data between RDS and Gadi from the Gadi login shell:
Open a terminal using the ‘Terminal’ app on MacOS or the ‘Command Prompt’ app on Windows and then log into Gadi using ssh:
ssh <nci_user_id>@gadi.nci.org.auYou may be prompted to enter your NCI password at this point.
Get the data from RDS, to a specific location on Gadi, e.g:
sftp -r <your_unikey>@research-data-ext.sydney.edu.au:/rds/PRJ-<Project Short ID>/<Path to File or Folder> <location on Gadi>For example if I wanted to copy data from my
Trainingproject on RDS in the folderMyDatato Gadi in the scratch space for my NCI project namedqc03:sftp -r <my_unikey>@research-data-ext.sydney.edu.au:/rds/PRJ-Training/MyData /scratch/qc03/MyDatareplace
/rdsin the above with/projector/scratchfor your preferred source folder or file.If you want to copy the other way around (ie. from Gadi /scratch to RDS) use
sftp <your_unikey>@research-data-ext.sydney.edu.au:/rds/PRJ-<Project Short ID>/<Path to File or Folder> <<< $"put -r <location on Gadi>"
When transferring data to RDS you may see permission denied warnings such as:
Couldn't setstat on <path>: Permission deniedThese messages are caused by an attempt to modify the permissions of newly created directories on RDS and can usually be safely ignored. If you see these errors you can (and should) verify the files are in their expected location on RDS after your copy just to be sure.
Using tmux to run commands in persistent terminal sessions
While this method can help you run your copy job in the background over a long period of time, it is recommended to rather use Globus or the copyq transfer method described below for large file transfers, as running jobs on the login node can overwhelm their scant resources.
You can run data transfers or other long-running commands in a tmux persistent session which can be detached to run in the background. This allows you to log out and even switch off your computer while the command still runs within the detached session. You can reattach to the tmux session later to review the command’s progress and output.
For example, to copy data from RDS to Gadi with rsync within a tmux session:
- Login to RDS:
ssh <unikey>@research-data-int.sydney.edu.au - Start a
tmuxsession: entertmux - Once inside the new session, issue the rsync command:
rsync -rtlPvz /rds/PRJ-<project>/<path-to-data> <nci_user_id>@gadi-dm.nci.org.au:<gadi-destination-path> - Detach from the session: enter
ctrl B + D - You can later reattach to the same session from a new ssh connection to
research-data-int.sydney.edu.auwith:tmux attach
For more information about tmux and its options, check here.
Transfer using sftp or lftp from Gadi copyq
The data transfer queue on Gadi is called copyq. This is comparable to the dtq data transfer queue you may be familiar with on the recently decommissioned Artemis HPC. Data transfer methods/scripts that you previosuly used to put data onto Artemis for example from the web via wget or from another server should be easily portable to use on Gadi’s copyq.
You will need an ssh key pair between Gadi and research-data-ext (the RDS login server) for passwordless transfers running on the copyq. Users have a home directory on research-data-ext with a very small quota to enable storing of ssh key files. See below for instructions for creating the key pair.
Please note that the compute nodes on Gadi do not have internet access, so all required data must first be downloaded before submitting a compute job that requires the data.
Due to stringent security settings around RDS, commands like rsync or scp cannot be initiated from NCI Gadi login nodes or copyq. To initiate the transfer from Gadi, sftp or lftp must be used. Globus is now available for data transfer between NCI and RDS, and provided that your project can approve the data security policy, Globus is the preferred method for transferring data between Gadi and RDS.
How to set up SSH keys for passwordless data transfer
If you are transferring data directly for example scp on the command line or via a transfer client on your local computer, entering a password to initiate the transfer is straightforward. If however you want to transfer via a job submitted to either copyq or dtq, you will need to set up SSH keys first, or else your script will halt while it waits for a password to be entered.
You only need to set this up once.
SSH key pairs are used for secure communication between two systems. The pair consists of a private key and a public key. The private key should remain private and only be known by the user. It is stored securely on the user’s computer. The public key can be shared with any system the user wants to connect to. It is added to the remote system’s authorized keys. When a connection is attempted, the remote system uses the public key to create a message for the user’s system.
There are many general guides for this online, for example this one.
Follow the below steps carefully to set up SSH keys between RDS and Gadi. Note, you only need to do this once.
Log into Gadi with your chosen method, e.g:
ssh ab1234@gadi.nci.org.auMove to your home directory:
cd ~Make a
.sshdirectory, if you don’t already have one:mkdir -p .sshSet suitable permissions for the
.sshdirectory and move into it:chmod 700 .ssh cd .sshGenerate SSH key pair:
ssh-keygenHit enter when prompted, saving the key in
~/.ssh/id_rsaand enter for NO passphrase. A public key will be located in~/.ssh/id_rsa.puband a private key in~/.ssh/id_rsa.Set suitable permissions for the keys:
chmod 600 id_rsa
chmod 644 id_rsa.pub
Make an
authorized_keysfile if you don’t already have one:touch ~/.ssh/authorized_keysCopy the contents of the public key file (
~/.ssh/id_rsa.pub) to theauthorized_keysfile:cat ~/.ssh/id_rsa.pub >> ~/.ssh/authorized_keysSet permissions for the
authorized_keysfile:chmod 600 ~/.ssh/authorized_keysConnect to USyd’s RDS login server using
lftpand your unikey:lftp sftp://<your-unikey>@research-data-ext.sydney.edu.auProvide your unikey password when prompted. When you log in, you are in your personal home directory on the RDS login server. This is NOT the place to store data, only ssh key files.
Then make and move into a
.sshdirectory if you don’t already have one:mkdir -p ~/.ssh cd ~/.sshTransfer the
authorized_keysfile from Gadi to USyd’s RDS login server:put authorized_keysDoing this will transfer authorized_keys on Gadi to your current directory on RDS (/home/
). With lftp, it will look for the file relative to where you launched lftp. You can check where you are on Gadi using: local pwdExit your
lftpconnection to RDS by enteringctrl + d. You are now back to your Gadi session. Then, test the passwordless connection:sftp <your-unikey>@research-data-ext.sydney.edu.auThis time, you shouldn’t be prompted for a password. You can proceed to transfer data between Gadi and RDS now on the
copyq.
If you get the error “Fatal error: Host key verification failed” you may have to get an “ssh fingerprint” first. Do this by sending an ssh request to the RDS with:
ssh <your-unikey>@research-data-ext.sydney.edu.auAccept that you trust the connection and enter your password. The connection will then close with the following message:
This service allows sftp connections only.
Connection to research-data-ext.sydney.edu.au closed.
But now try lftp connection again!
Template copyq scripts for transferring data with sftp
The scripts below use sftp to transfer data between RDS and Gadi on the Gadi copyq. sftp can transfer whole files and directories but must copy all of your data every time, it cannot only copy modified files like rsync can. This makes it considerably slower for copying large datasets where only minor changes have been made during a run. An alternative command lftp can behave like rsync but is slower to transfer than sftp. We also provide a template lftp script below.
Copies of these scripts have been placed in /scratch/qc03/data-transfer-scripts/gadi-scripts. You can make a copy of these scripts to your /scratch/<nci-project-code> or /home/<nci-user-id> workspace on Gadi and edit (for example using nano <script>), by replacing the names described in the header to suit your needs.
There are two scripts:
from_gadi_to_rds.pbsis used to transfer a file or folder from Gadi to RDSfrom_rds_to_gadi.pbsis used to transfer a file or folder from RDS to Gadi
from_gadi_to_rds.pbs script, replace variables in <brackets> as described:
#!/bin/bash

# Transfer from Gadi to RDS
#

# Make the following replacements in this file:
# <unikey>      : Your USyd unikey
# <rds_project> : Your RDS project name
# <local_path>  : The local file or folder you want to copy
# <remote_path> : The location on RDS to put your folder
# <nci_project> : Your NCI project name

#PBS -P <nci_project>
#PBS -N transfer
#PBS -l walltime=04:00:00
#PBS -l ncpus=1
#PBS -l mem=8GB
#PBS -W umask=022
#PBS -q copyq
#PBS -l wd
#PBS -lstorage=scratch/<nci_project>

remote_user=<unikey>
remote_host=research-data-ext.sydney.edu.au
remote_path=/rds/PRJ-<rds_project>/<remote_path>

# NOTE: Add a trailing slash (/) to local_path if you don't want to create the
# parent directory at the destination.
local_path=<local_path>

sftp ${remote_user}@${remote_host}:${remote_path} <<< $"put -r ${local_path}"from_rds_to_gadi.pbs script, replace variables in <brackets> as described:
#!/bin/bash

# Transfer a folder from RDS to Gadi
# This will recreate your RDS path (/rds/PRJ-<rds_project>)
# on Gadi in /scratch/<nci_project>

# Make the following replacements in this file:
# <unikey>      : Your USyd unikey
# <rds_project> : Your RDS project name
# <remote_path> : The location on RDS of your file ot directory to copy
# <local_path>  : The name of the folder to copy to
# <nci_project> : Your NCI project name

#PBS -P <nci_project>
#PBS -N transfer
#PBS -l walltime=04:00:00
#PBS -l ncpus=1
#PBS -l mem=8GB
#PBS -W umask=022
#PBS -q copyq
#PBS -l wd
#PBS -lstorage=scratch/<nci_project>

# RDS:
remote_user=<unikey>
remote_host=research-data-ext.sydney.edu.au

# NOTE: Add a trailing slash (/) to remote_path if you don't want to create the
# parent directory at the destination.
remote_path=/rds/PRJ-<rds_project>/<remote_path>

# Gadi:
dest_path=/scratch/<nci_project>/<local_path>

# Copy folder with sftp
sftp -r ${remote_user}@${remote_host}:${remote_path} ${dest_path}
Here is an example showing you how to transfer a folder called MyData in the RDS project Training to some scratch space in Gadi owned by project aa00.
copyq transfer from RDS to Gadi
Log into Gadi and change directory to your project space and make a folder for your workspace:
# Using an example username tm0000
ssh tm0000@gadi.nci.org.au

cd /scratch/aa00

# Make a folder called workspace in /scratch/aa00/tm0000
mkdir -p /scratch/aa00/tm0000/workspace
Copy the required data transfer script template from /scratch/qc03 to your newly made workspace. In this case we are copying from RDS to Gadi so we use the from_rds_to_gadi.pbs script. You can also cut and paste the template script into your editor from above and save the edited script to your workspace.
cp /scratch/qc03/data-transfer-scripts/gadi-scripts/from_rds_to_gadi.pbs /scratch/aa00/tm0000/workspaceThen follow the script and move to that workspace and open the script in an editor (in this example we’ll use the nano editor):
cd /scratch/aa00/tm0000/workspace

nano from_rds_to_gadi.pbs
You need to edit the script by replacing all the variables marked with <> described in the script header and fill in the following details before using it:
In the #PBS variables part of the script:
Provide the -P variable by replacing
<nci_project>with your NCI project code. In this exampleaa00.Increase the walltime if you are transferring large files, the limit on this queue is 10 hours.
Alter
-lstorage=scratch/<project>as required. If you also need to access g/data, you can change this toscratch/<project>+g/data/<project>. In this example we’ll just usescratch/aa00
In the body of the script:
Provide the
remote_uservariable by replacing<unikey>with your USyd unikey.Provide the
remote_pathvariable by replacing<rds_project>and<local_path>with your RDS project name and path to the file or directory you want to transfer. In this example we useremote_path=/rds/PRJ-Training/MyData
Here is what the script will look like when correctly edited for this example:
#!/bin/bash

#PBS -P aa00
#PBS -N transfer
#PBS -l walltime=04:00:00
#PBS -l ncpus=1
#PBS -l mem=8GB
#PBS -W umask=022
#PBS -q copyq
#PBS -l wd
#PBS -lstorage=scratch/aa00

# RDS:
remote_user=tm0000     #Example unikey tm0000
remote_host=research-data-ext.sydney.edu.au

# NOTE: Add a trailing slash (/) to remote_path if you don't want to create the
# parent directory at the destination.
remote_path=/rds/PRJ-Training/MyData

# Gadi:
# This will create /scratch/aa00/MyData if transferring a folder and it doesn't already exist.
dest_path=/scratch/aa00/MyData

# Copy with sftp
sftp -r ${remote_user}@${remote_host}:${remote_path} ${dest_path}
When you have finished editing the script save it (using <ctrl>-x and answering y at the prompt if using nano as your editor)
Run the transfer script
Once you have customised the script, you can submit it to the copyq on Gadi. Run the script from the directory where you saved it:
qsub from_rds_to_gadi.pbsThis can be a nerve-wracking process, especially if you are transferring large files. You can check the status of your job on Gadi using:
qstat -EswOnce it says R (running), you can confirm it is going to where you want on RDS or Gadi by logging into the system and checking for the presence of the file/directory in its expected location using:
ls MyDataConfirm transfers after completion
To confirm the transfer was successful, you’ll need to check your job logs. These are located in the same directory as your script and are named transfer.o<jobid>.
However, this doesn’t guarantee the integrity of the files. You should check the files themselves to ensure they are intact. You can do this using md5checksums as described below.
Template copyq scripts for syncing data with lftp
If you have a large project with many files and only a few of them are modified at any time you can use the mirror command in lftp to only sync the modified files when you are backing up data to RDS. The lftp - mirror command transfers data at a slower speed than sftp but will significantly speed up the backup of data since it generally only needs to copy a small subset of all of the data on Gadi if only a few files have changed since the last sync.
It also includes the --continue flag (similar to -P in rsync), which will continue a transfer from a partially transferred file in the case of an interrupted transfer. This avoids re-transferring failed files from the start, and enables you to transfer very large files requiring greater than the 10 hour copyq walltime limit simply by resubmitting the same transfer script.
Below is a template .pbs script that can be used to sync files between Gadi and RDS, you can copy it to your workspace and modify it as needed similarly to the example above. You can also find this script on Gadi in /scratch/qc03/data-transfer-scripts/gadi-scripts/sync_gadi_to_rds.pbs.
Note that when using this script to copy a folder you should ensure the target directory exists on RDS first, otherwise the parent directory will not be synced with the data.
#!/bin/bash

# Mirror directory from Gadi to RDS
#

# Make the following replacements in this file:
# <unikey>:       Your USyd unikey
# <rds_project>:  Your RDS project name
# <path-on-rds>:  The location on RDS to put your directory
# <path-on-gadi>: The directory on Gadi to mirror to rds
# <nci_project>:  Your NCI project name

#PBS -P <nci_project>
#PBS -N transfer
#PBS -l walltime=04:00:00
#PBS -l ncpus=1
#PBS -l mem=8GB
#PBS -W umask=022
#PBS -q copyq
#PBS -l wd
#PBS -lstorage=scratch/<nci_project>

remote_user=<unikey>
remote_host=research-data-ext.sydney.edu.au
remote_path=/rds/PRJ-<rds-project>/<path-on-rds>

source_path=<path-on-gadi>

outfile="${PBS_O_WORKDIR}/${PBS_JOBNAME}_${PBS_JOBID}.log"
echo "Writing log to: ${outfile}"
touch $outfile

lftp -u ${remote_user}, sftp://${remote_host} <<EOF
set xfer:log true
set xfer:log-file "${outfile}"
mirror \
    --no-perms \
    --continue \
    --verbose \
    --reverse \
    ${source_path} \
    ${remote_path}
exit
EOF
Suggested workflow for copying data between RDS and Gadi and keeping it up-to-date
The sftp copy method and lftp sync methods described above both have their pros and cons:
sftphas a faster transfer speed but can only copy all your files in bulk when it is run.lftphas a slower transfer speed but it can sync only the subset of files that have changed.
Because of this we suggest users be selective about which method they use based on their needs.
For example a simple workflow for large projects that have a lot of data and many files in a folder, only a few of which are changed between backups to RDS would be:
Initially use the
sftpbasedfrom_rds_to_gadi.pbsscript to bulk copy your data from RDS to your project space on Gadi, since this is faster for bulk transfers.Subsequently use the
lftpbasedsync_gadi_to_rds.pbsto sync smaller files (e.g. output logs and data) back to RDS, without having to re-copy the bulk of the data back to RDS.
Verify the integrity of your transferred data
When you transfer files between systems, especially over a network using tools described above, there is always a small risk that the data could become corrupted. This might happen for example due to network issues, disk errors, or file system problems. It is therefore important that you verify that your files were transferred completely and accurately. We can do this using a checksum.
A checksum is a small, fixed-size value calculated from the contents of a file using a specific algorithm (like MD5, SHA-1, or SHA-256). Think of it as a unique fingerprint for the file’s data: if even one byte changes, the checksum will be different. By comparing the checksum before and after the transfer, you can confirm that the file is exactly the same on both ends.
If you are using Globus, checksum verification is included by default, and failed transfers are automatically retried. You will receive an email with a status of “SUCCESS” once all files in your transferred dataset have been copied and verified at the destination.
The overall process of verifying data transfer manually with md5sums is outlined in the figure below. In some cases, you may already have checksum files that you have previously generated, or even downloaded with your raw data. If so, there is no need to re-generate the “source” checksum files.
For transfers from RDS to Gadi, RDS is the “source” and Gadi is the “destination”:
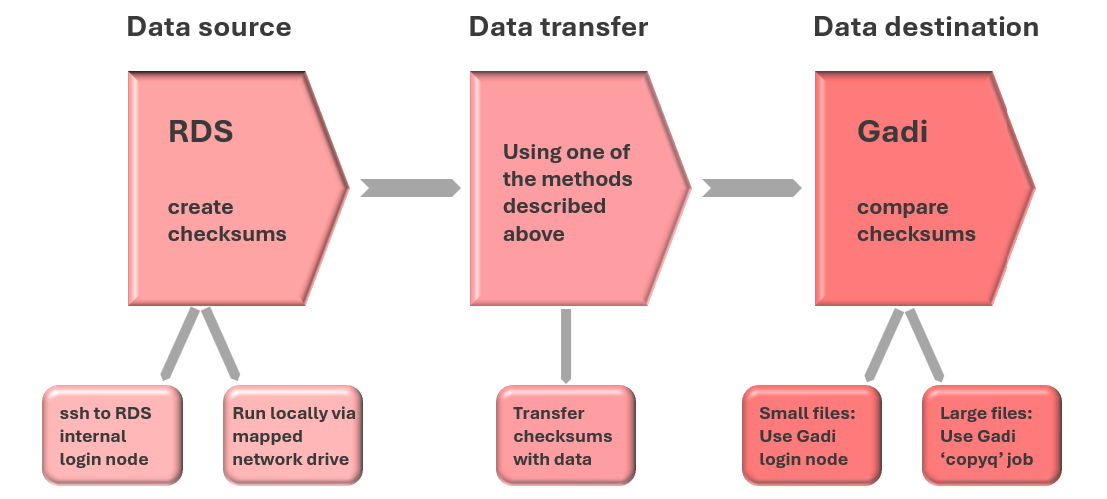
Note that the source and destination are reversed when transferring output files generated on Gadi back to RDS.
Using md5sum to validate files: from RDS to Gadi
Here we demonstrate how you can use the command md5sum to generate a list of MD5 checksums for a directory on RDS, and then use these checksums to validate the integrity of your files after the data has been transferred to Gadi.
1. Create a list of checksums for your files at the source (before copying the data)
Connect to the RDS internal login node with ssh (remember to have VPN connected if off-campus):
ssh <unikey>@research-data-int.sydney.edu.auEnter your unikey password, and once connected to RDS, navigate to the folder containing the data you are going to transfer to Gadi.
Use the md5sum command to produce a md5 hash for every file within that directory and its subdirectories:
cd /rds/PRJ-<dashR-project>/myData

find -type f \( -not -name "myData.md5" \) -exec md5sum '{}' \; > myData.md5
This will generate a file called myData.md5 in your folder listing a hash for every file (except for the myData.md5 file).
2. Copy the data to Gadi
You should do this using one of the methods described above in this page - make sure to also transfer the .md5 file and keep it in the same relative location as it was at the source (RDS).
3. Verify the copy of the files on Gadi
Once the transfer of data and checksum files to Gadi are complete, you can use the -c (check) flag to the checksum command to verify file integrity.
For small files, you can easily run this on the Gadi login nodes, eg:
cd /scratch/<nci-project-id>/myData
md5sum -c myData.md5
This command goes through the list of files in myData.md5 and compares the md5 sum of the file on Gadi to the md5 sum that was created for the file on RDS.
For larger files, or very large numbers of files, the checksum process can take some time (eg > 10 minutes for a single 100 GB file) so it is more robust to run the checksum commands within a PBS job submitted to the Gadi job scheduler.
You can do this simply by placing the checksum command described above inside a Gadi job script.
Files which have been transferred with full integrity will report “OK”:
file1.txt: OK
sub_folder/file2.txt: OK
If there was a problem with any file, you’ll see a warning like:
file3.txt: FAILEDRedirecting the output of the md5sum -c command to a file can simplify collecting failed transfers for resubmission:
md5sum -c myData.md5 > myData.md5.check
grep FAILED myData.md5.check > myData.md5.check.FAILED
Any files with FAILED status should be re-copied from RDS to Gadi, and the checksum comparison run again.
Using md5sum to validate files: from Gadi to RDS
When working on Gadi, you will want to regularly back up important data (for example job outputs, logs, scripts) to RDS. Gadi scratch and gdata filesystems are not backed up, so regular backups to RDS are critical.
The high-level checksum process is the same as it was for RDS to Gadi, but the source and destination are reversed.
1. Create a list of checksums for your files at the source (before copying the data)
On Gadi, you can create the checksum file with the same md5sum command as described above, either on the Gadi login node, or from within a Gadi job script.
Importantly, the Gadi compute queues can read gdata, unlike Artemis where the general compute queues could not read RDS. So, if your data is on gdata, you do not need to copy it to scratch for checksum commands run within Gadi PBS jobs.
2. Copy the data to RDS
You should do this using one of the methods described above in this page - make sure to also transfer the .md5 file and keep it in the same relative location as it was at the source (Gadi).
3. Verify the copy of the files on RDS
Once the transfer of data and checksum files to RDS are complete, you can use the -c (check) flag to the checksum command to verify file integrity.
Connect to the RDS internal login node with ssh (remember to have VPN connected if off-campus):
ssh <unikey>@research-data-int.sydney.edu.auEnter your unikey password, and once connected, navigate to the directory containing the data you have just transferred from Gadi to RDS.
cd /rds/PRJ-<dashR-project>/myData
md5sum -c myData.md5 > myData.md5.check
grep FAILED myData.md5.check > myData.md5.check.FAILED
Any files with FAILED status should be re-copied from Gadi to RDS, and the checksum run again.
Alternate methods for running checksum commands on RDS
For large files or datasets with numerous files, creating checksums or running checksum comparisons can be time-consuming. When we ssh into research-data-int.sydney.edu.au and run the checksum command, this is reliant on your terminal window staying open and connected, your internet connection remaining stable, your computer not going to sleep or being switched off, etc. On Gadi, we can mitigate these issues by submitting long walltime checksum commands to the job scheduler. Below are some other options to run checksum commands (or any other data management commands) on data stored on RDS:
- Use Globus to transfer the data to RDS. Globus will perform the checksum verification for you.
- Map your RDS as a network drive on your local computer. Then, use your mac terminal, Windows Powershell, WSL2, etc to run the commands using your local computer’s resources. You will still need to ensure stable internet connection and that your computer does not go to sleep mode (unless using tmux, see below), however this setup may be more stable than relying on the ssh connection to the RDS login node.
- Run your checksum commands within a persistent terminal session with
tmux. You can do this with an ssh connection toresearch-data-int.sydney.edu.au, or from the mac/Powershell/WSL2 terminal reading the RDS mapped network drive. When you run your checksum command inside atmuxsession and then detach from it, the session (and the command) will remain active, even if you lose internet connection, close your terminal, or even power off your computer. You can reattach to the same session later to check the status of the checksum command. See the section on tmux above for basic use.